Posts

Getting the body and mind focused before a game or training session is very important but it can also be one of those things that can slip to the back burner and left stale with the same routines used time and time again. We’ve put together a list of 20 warm-up drills that you can use to mix it up at training and before games.


The following drills can be used at all levels and are focused on warming the body up while also getting plenty of ball work in.


1.Aerobic Warm-Up

Aerobic Warm Up Futsal Warm up Drills


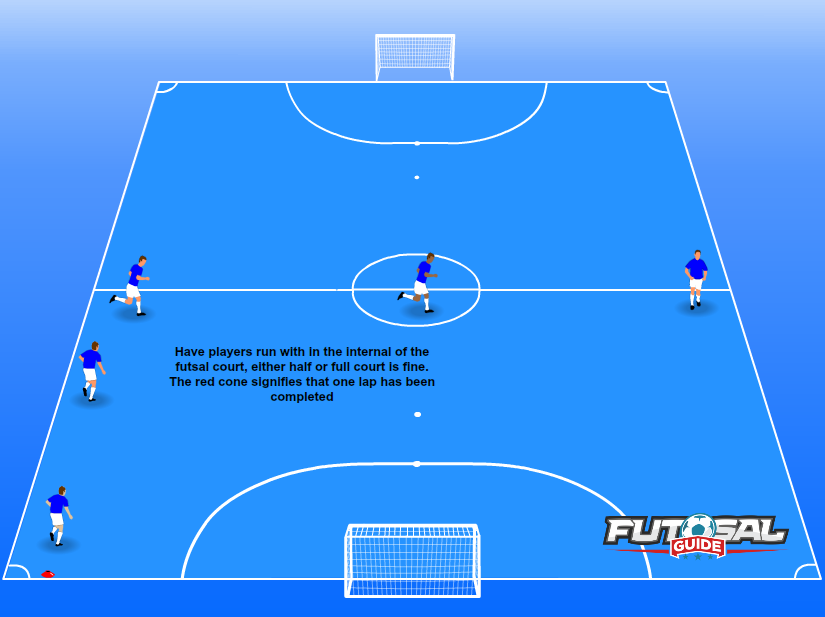
The aim of the aerobic warm-up is to get players bodies to start warming up from their “cold muscle state”. The goal here isn’t to try and get players operating at maximum capacity but to get their bodies ready for more strenuous exertion.


Getting players to jog around the internal or external perimeter of the futsal court or even within one half if the opposition is using the other half is a great way to get the blood flowing.


We recommend a minimum of 10 minutes, a light jog may not seem like much but when done without stopping the players’ bodies will be ready for more exercises with an elevated heart rate.


A light jog before more strenuous exercises is also a great way for players to see if they are suffering any niggling injuries or if they are fit for the match ahead.


You can read our comprehensive guide to warm-up exercises for the body here.


2. Man In The Middle


Get players to form a circle, if you have enough players form two. The object of this warm-up exercise is for the player that’s located in the middle to intercept passes between the players on the circle perimeter.


A basic exercise but it is one that requires players to think before they make a pass and for the players located within the circle, they must focus on reading players body language and ball interception.


A good exercise for switching players mental focus as well as their physical, an exercise that’s used at all levels from junior to professional in both outdoor soccer and futsal.


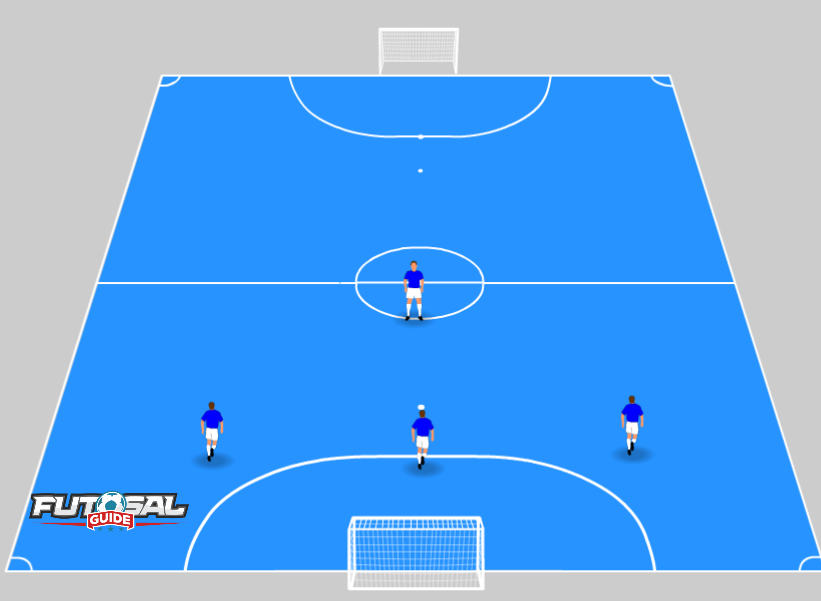
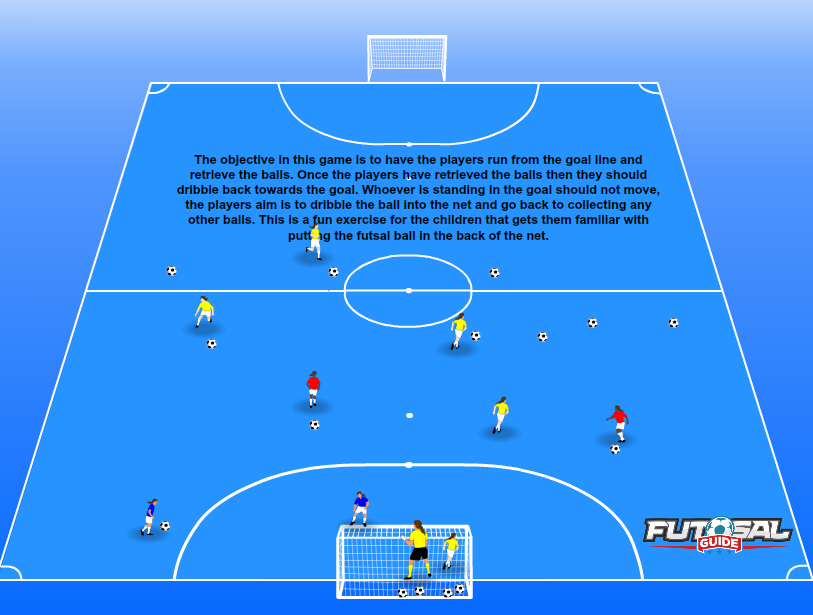
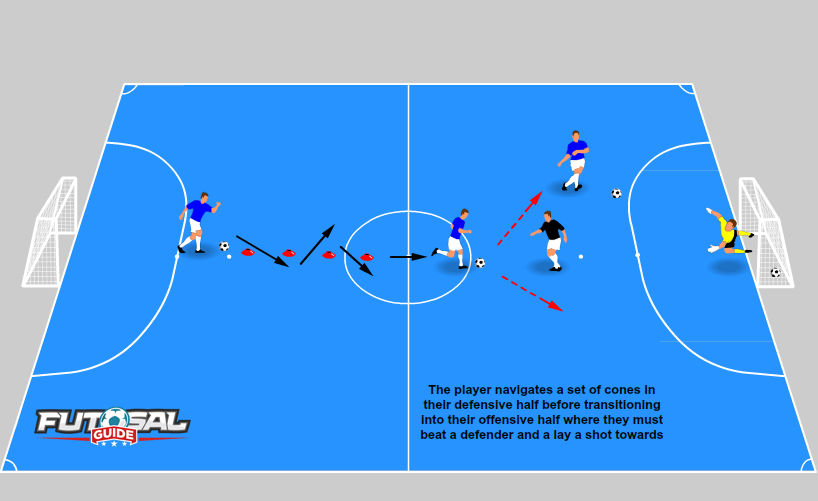
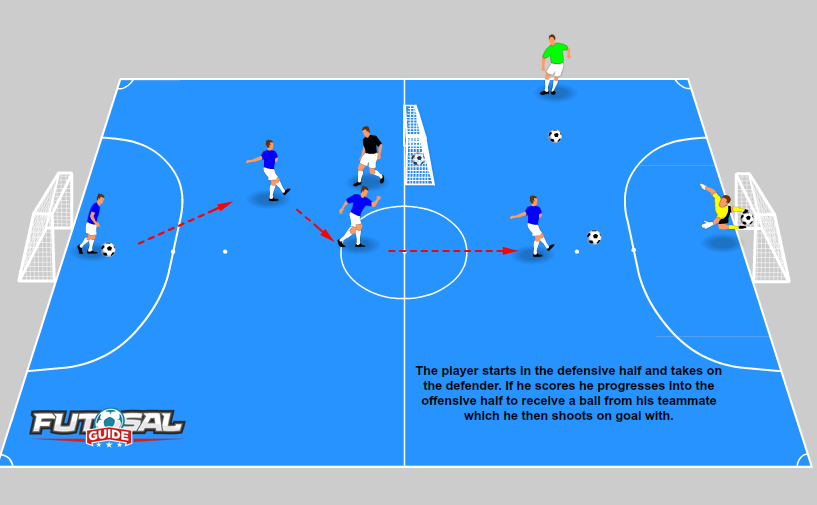
3. 2v2 Attackers vs Defender and Goalkeeper

2 Vs 2 - Futsal Warm Up Drills


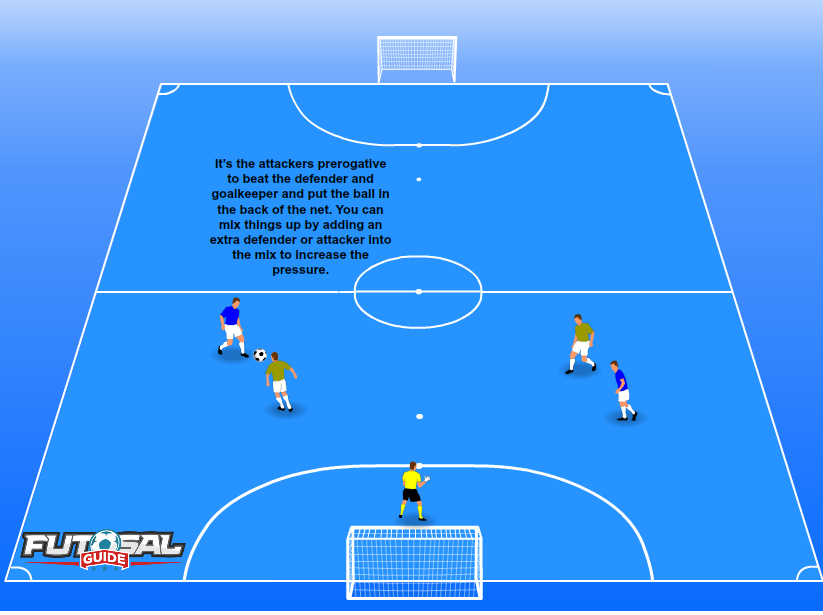
This one will require five players in total, have a player set up at the goal line with the futsal ball, that player will pass the ball to the attackers who are situated on the halfway line. You’ll need a defender and goalkeeper to act as the defenders.


It’s the attackers prerogative to beat the defender and goalkeeper and put the ball in the back of the net. You can mix things up by adding an extra defender or attacker into the mix to increase the pressure.


You may also wish to add extra restrictions such as:


  • No more than six touches


  • Time limit i.e. 60 seconds


  • Not letting the defender touch the ball


Once the players have been through have them switch out to ensure all players play the roles of attackers and defenders, as futsal is such a fluid game all players need to be comfortable with attacking and defending and if needed goalkeeper duties from time to time.


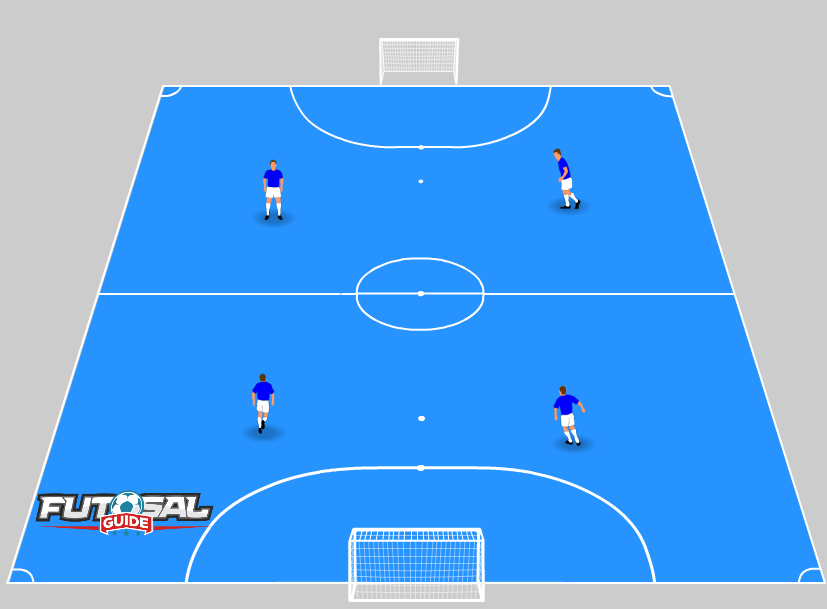
4.Cross Passing/Diagonal Runs


Divide your team into two groups, have the two groups split again and face each other, approximately 5-7 meters apart in both directions. Call the groups 1 & 2 for argument’s sake.


The objective here is for the groups to face each other and pass the ball to their teammates but then run diagonally across and join the other group.


i.e. Player from group 1 passes to another player from group 1 and then runs diagonally across to join group 2. As the passes start players will need to be aware of the opposition player coming in the other direction.


5.Attacker Vs Goalkeeper

Attacker Vs Goalkeeper Futsal Warm Up Drills


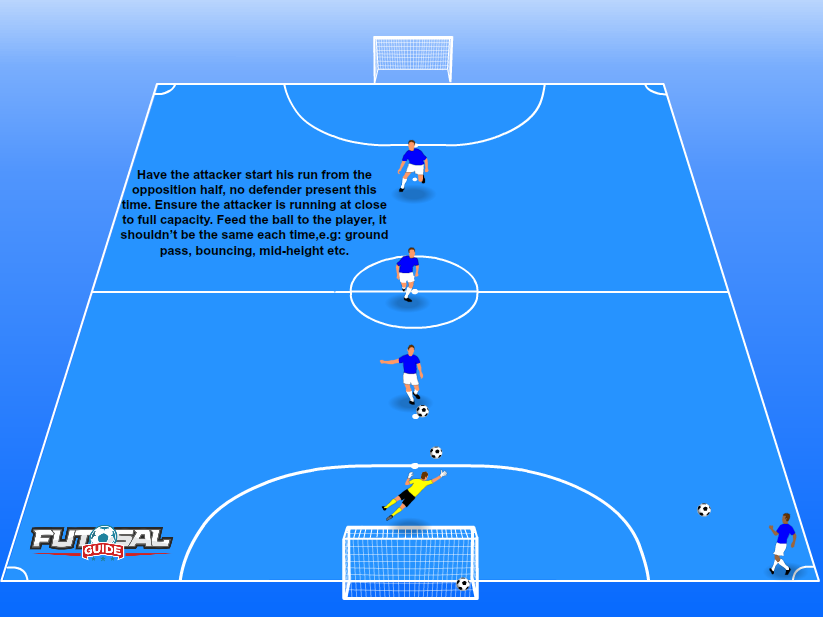
Have the attacker start his run from the opposition half, no defender present this time. Ensure the attacker is running at close to full capacity. Feed the ball to the player, it shouldn’t be the same each time,e.g: ground pass, bouncing, mid-height etc.


The aim here is for the player to try and control the ball mid-stride and then beat the goalkeeper. Players should get an opportunity to try the drill a few times with each time requiring a different type of finish such as right foot, left foot, header, volley and so on.


You can add extra constraints such as cones or a defender that jockeys only.


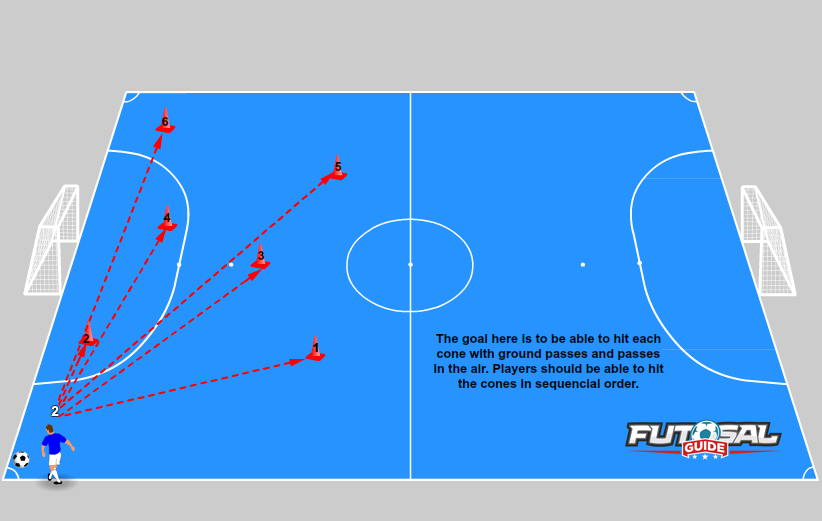
6. Two Balls Two Feet

Two Balls Two Feet Futsal Warm Up Drills


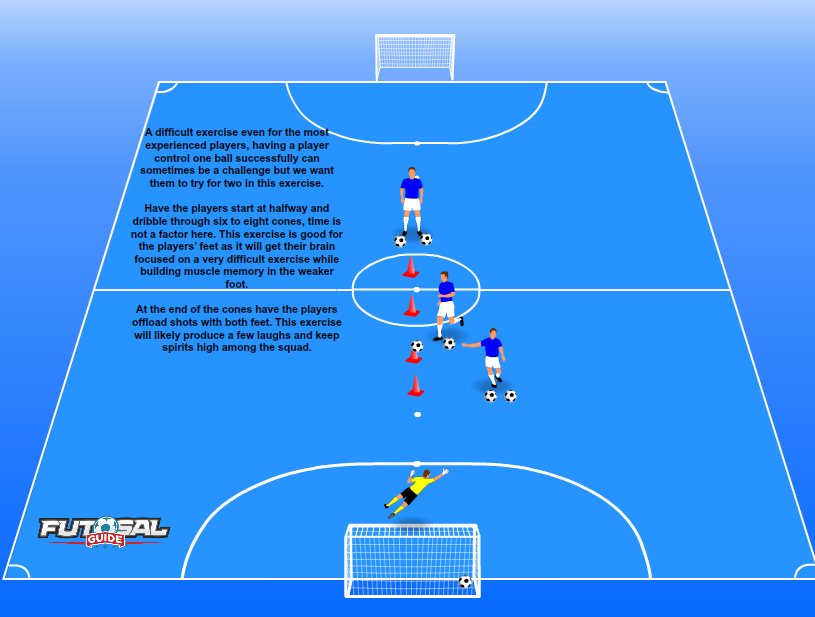
A difficult exercise even for the most experienced players, having a player control one ball successfully can sometimes be a challenge but we want them to try for two in this exercise.


Have the players start at halfway and dribble through six to eight cones, time is not a factor here. This exercise is good for the players’ feet as it will get their brain focused on a very difficult exercise while building muscle memory in the weaker foot.


At the end of the cones have the players offload shots with both feet. This exercise will likely produce a few laughs and keep spirits high among the squad.


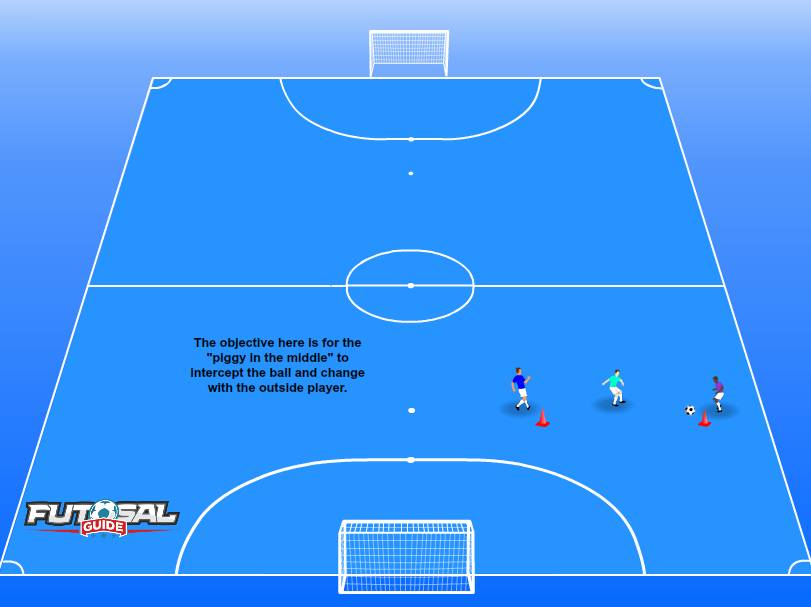
7.Piggy In The Middle

Piggy In the Middle Futsal Warm Up Drills


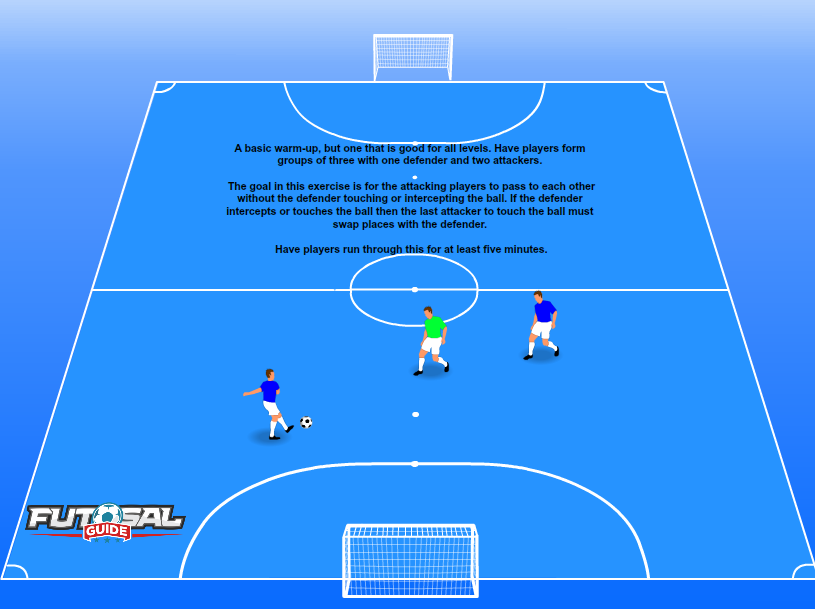
A basic warm-up, but one that is good for all levels. Have players form groups of three with one defender and two attackers.


The goal in this exercise is for the attacking players to pass to each other without the defender touching or intercepting the ball. If the defender intercepts or touches the ball then the last attacker to touch the ball must swap places with the defender.


Have players run through this for at least five minutes.
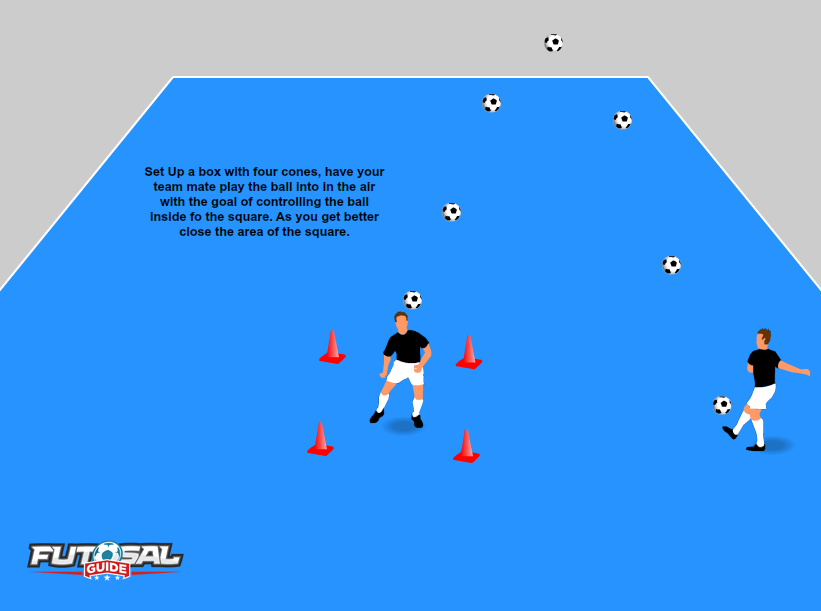
 

8. Keepy Up

Keepy Up Futsal Warm Up Drills


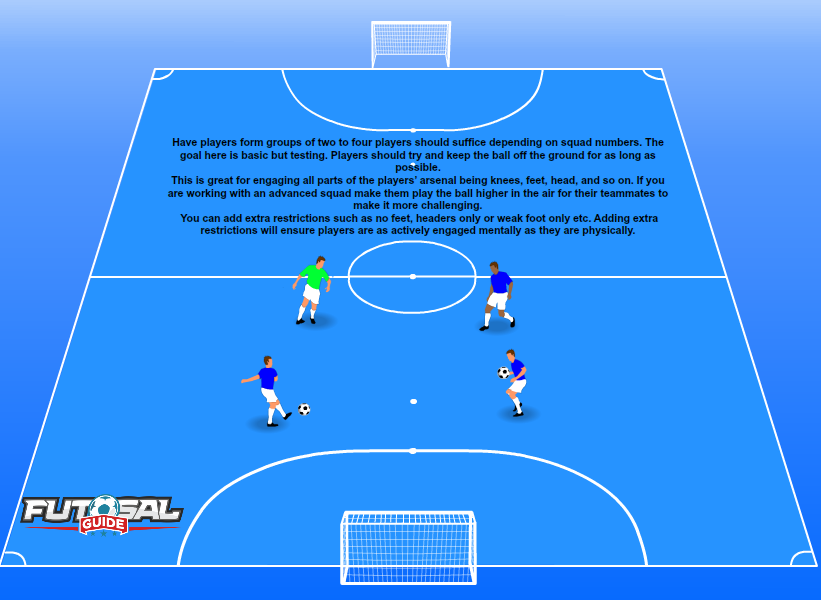
Have players form groups of two to four players should suffice depending on squad numbers. The goal here is basic but testing. Players should try and keep the ball off the ground for as long as possible.


This is great for engaging all parts of the players’ arsenal being knees, feet, head, and so on. If you are working with an advanced squad make them play the ball higher in the air for their teammates to make it more challenging.


You can add extra restrictions such as no feet, headers only or weak foot only etc. Adding extra restrictions will ensure players are as actively engaged mentally as they are physically.
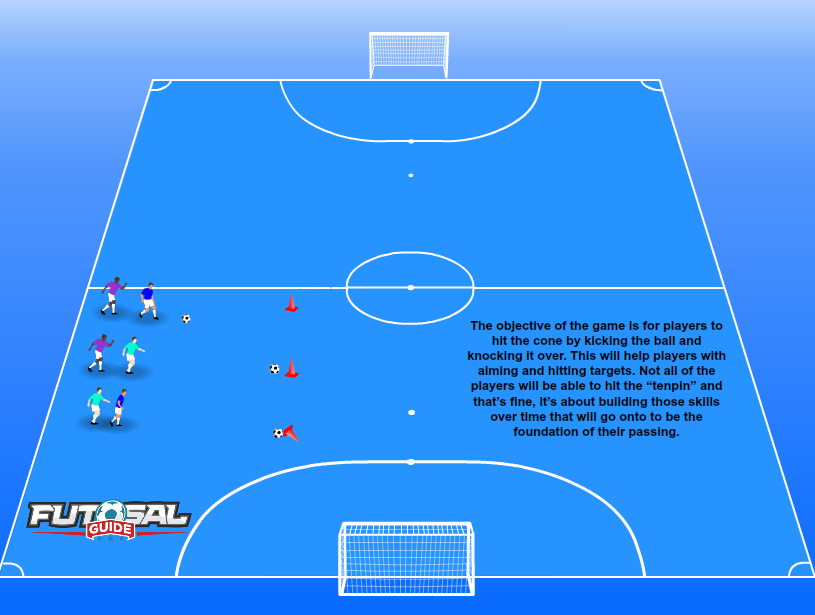
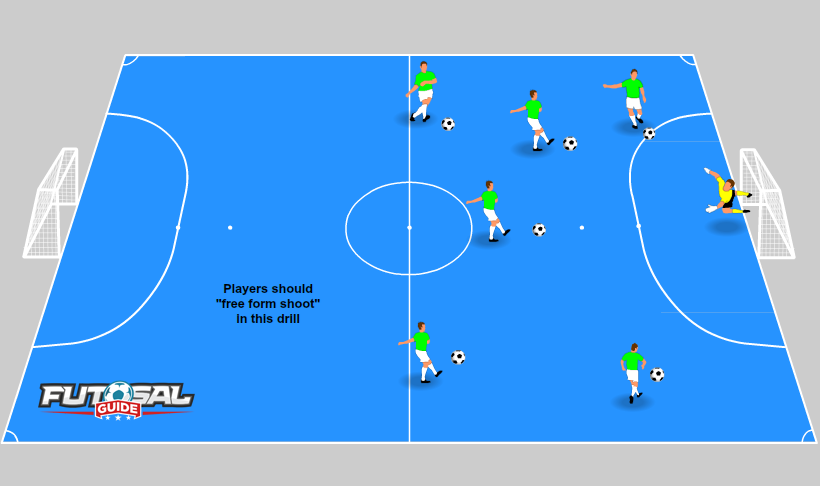
 

9.Goalkeeper Blitz

Goalkeeper Blitz Futsal Warm Up Drills


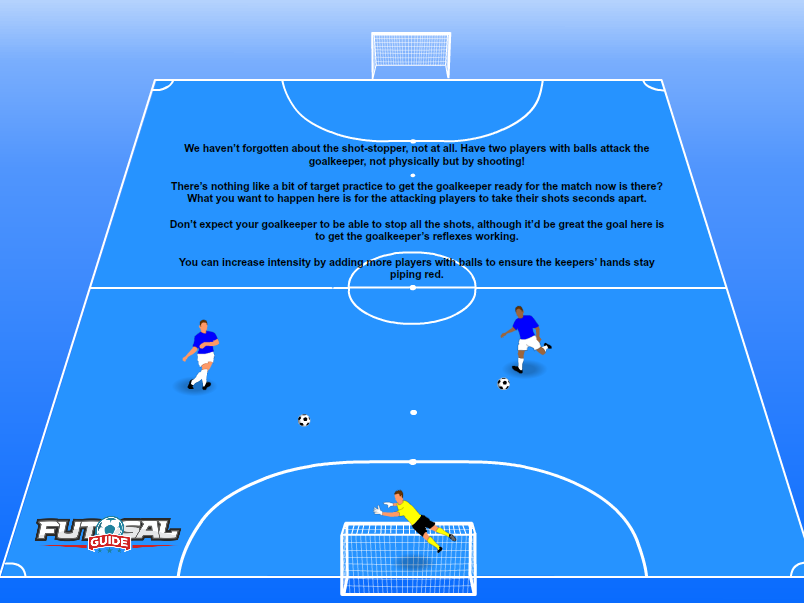
We haven’t forgotten about the shot-stopper, not at all. Have two players with balls attack the goalkeeper, not physically but by shooting!


There’s nothing like a bit of target practice to get the goalkeeper ready for the match now is there? What you want to happen here is for the attacking players to take their shots seconds apart.


Don’t expect your goalkeeper to be able to stop all the shots, although it’d be great the goal here is to get the goalkeeper’s reflexes working.


You can increase intensity by adding more players with balls to ensure the keepers’ hands stay piping red.


10. Quasi Handball

Quasi Handball Futsal Warm Up Drills


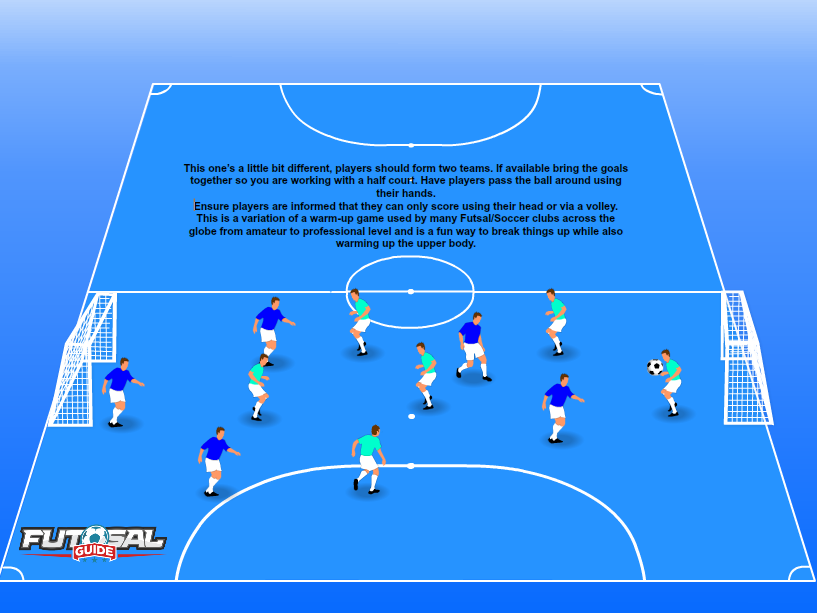
This one’s a little bit different, players should form two teams. If available bring the goals together so you are working with a half court. Have players pass the ball around using their hands.


Ensure players are informed that they can only score using their head or via a volley.


This is a variation of a warm-up game used by many Futsal/Soccer clubs across the globe from amateur to professional level and is a fun way to break things up while also warming up the upper body.


11. Futsal Tennis

Futsal Tennins Futsal Warm Up Drills


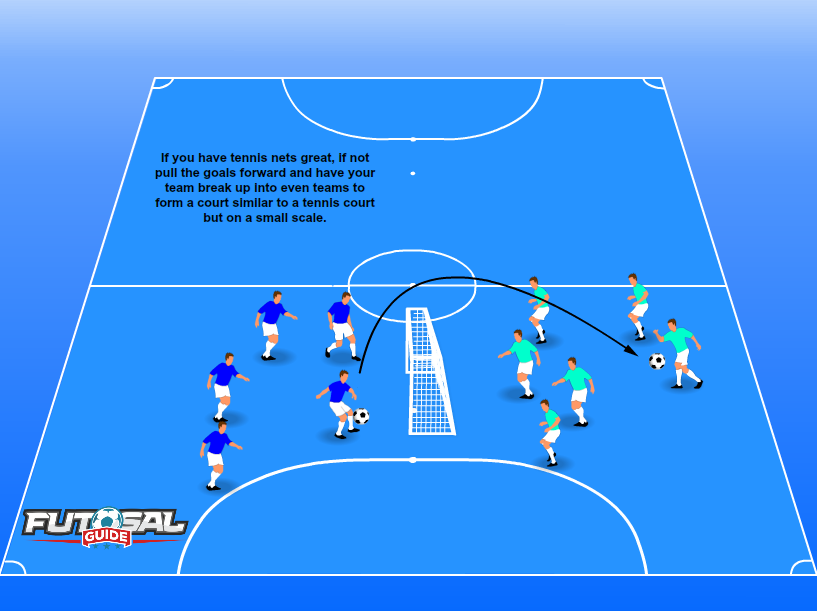
If you have tennis nets great, if not pull the goals forward and have your team break up into even teams to form a court similar to a tennis court but on a small scale.


You can add multiple rules to this one such as:


  • No bounce


  • Allowing the ball to bounce once


  • Headers only


  • Weak foot only


  • One bounce allowed, and so on.


I’ve found this to be another warm-up drill to help players bodies and minds ease into the impending game. Another great one for team morale.


12. Futsal Catch

Futsal Catch Futsal Warm Up Drills


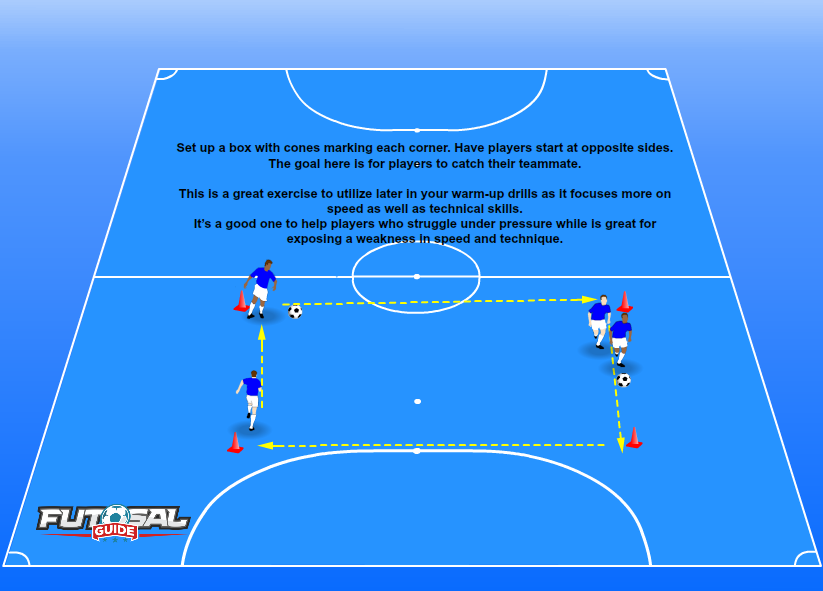
Set up a box with cones marking each corner. Have players start at opposite sides. The goal here is for players to catch their teammate.


This is a great exercise to utilize later in your warm-up drills as it focuses more on speed as well as technical skills.


It’s a good one to help players who struggle under pressure while is great for exposing a weakness in speed and technique.
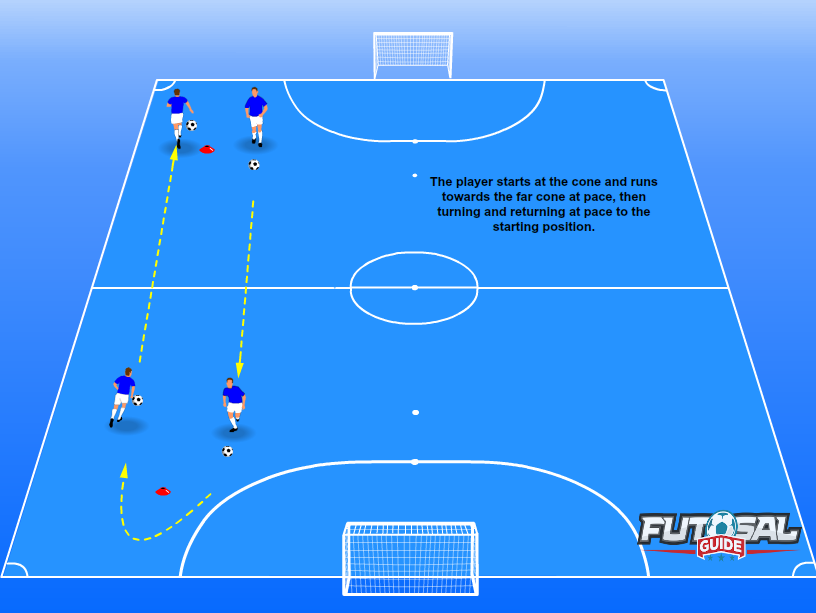
 

13.Suicide Sprints

Suicide Sprints Futsal Warm Up Drills


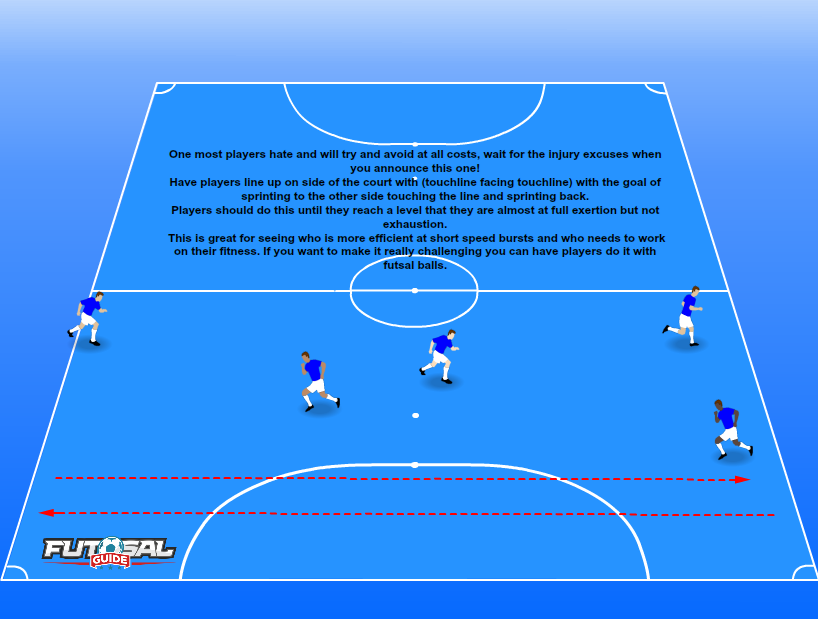
One most players hate and will try and avoid at all costs, wait for the injury excuses when you announce this one!


Have players line up on side of the court with (touchline facing touchline) with the goal of sprinting to the other side touching the line and sprinting back.


Players should do this until they reach a level that they are almost at full exertion but not exhaustion.


This is great for seeing who is more efficient at short speed bursts and who needs to work on their fitness. If you want to make it really challenging you can have players do it with futsal balls.
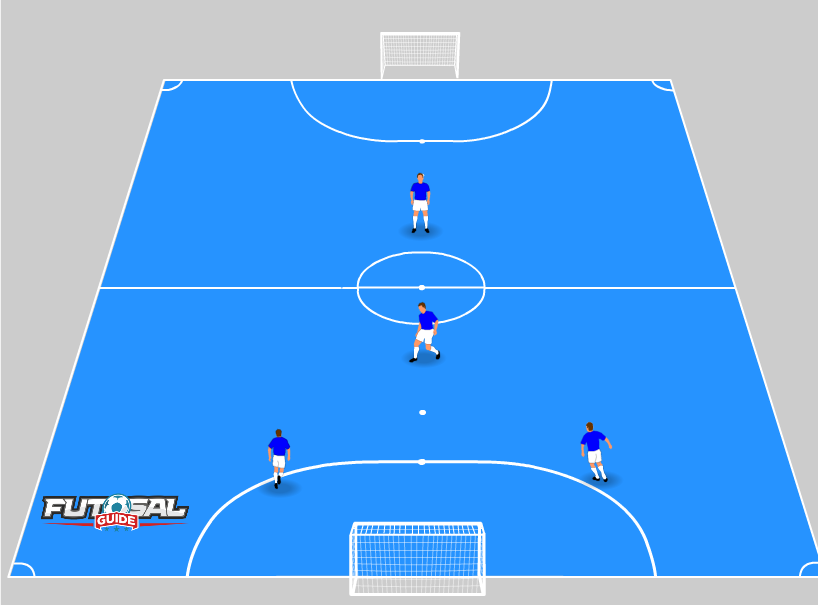
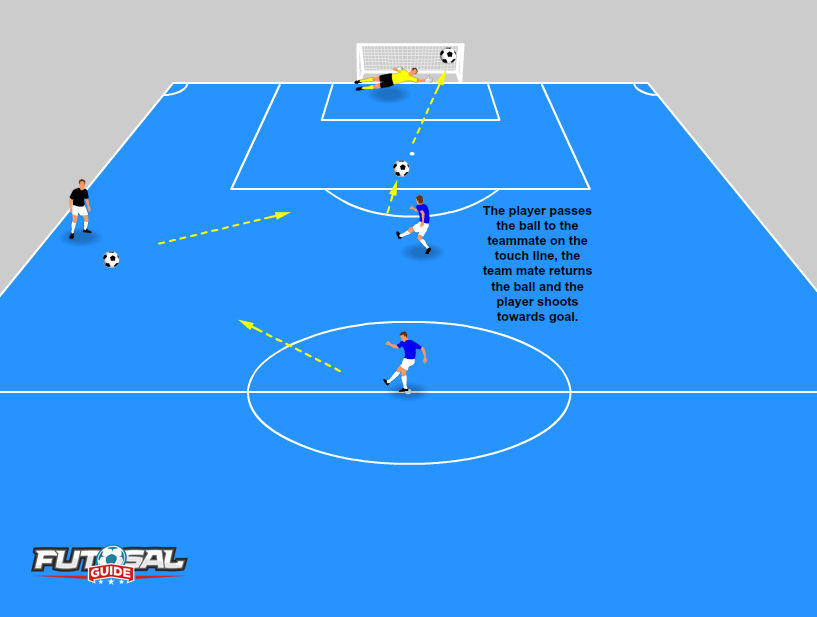
 

14. 1,2, Shoot!

1,2 Shoot Futsal Warm Up Drills


A classic and applied to both soccer and futsal, place one player in the middle of the attacking half towards the touchline and one player on the halfway line.


The player on the halfway line should pass the ball to the player on the touchline who will then play it back to the attacker.


The attacker should then receive the ball and shoot, each player should have a few run-throughs on both feet.


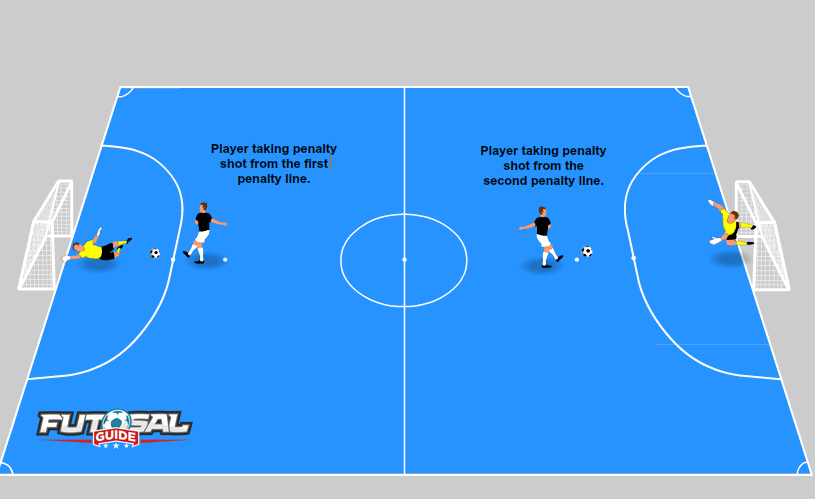
15. Practice Penalties

Practice Penalties Futsal Warm Up Drills


As there is a high chance of penalties in futsal it makes sense to get a few practice ones in and sort out a line up of it’s the type of game where one might be required.


Not only will it allow players to get a little more comfortable with the task but it also gives goalkeepers the opportunity to get some saving practice in and keep any potential butterflies away.


Don’t forget there are two penalty spots in futsal, you’d be wise to ensure that your players get practice from both spots.
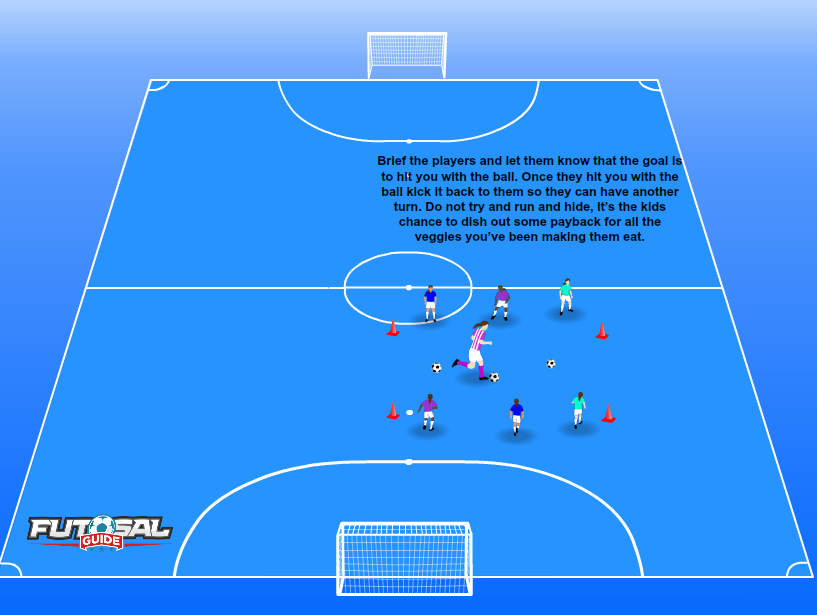
 

16. 1 vs The Rest

1 Vs The Rest Futsal Warm Up Drills


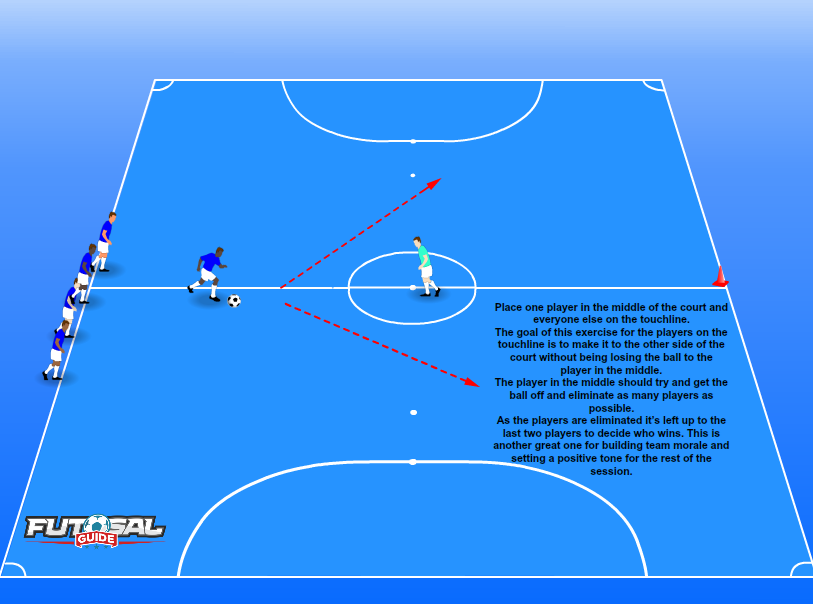
Place one player in the middle of the court and everyone else on the touchline.


The goal of this exercise for the players on the touchline is to make it to the other side of the court without being losing the ball to the player in the middle.


The player in the middle should try and get the ball off and eliminate as many players as possible.


As the players are eliminated it’s left up to the last two players to decide who wins. This is another great one for building team morale and setting a positive tone for the rest of the session.


17.Squats And Planks


Warming up isn’t all about running around with a ball and firing of worldies at the poor goalkeeper. Consider running the squad through some light squat work and planking drills.


Have players squat without weights for 5 x 30-second reps holding at the bottom. It may not sound like much but it will help engage the quads and core. It’s likely that if there are any niggles in that region players will find out now.


Get the players to plank with a goal of two minutes, planking will engage their core and back primarily. All good futsal players have strong cores so they can’t be easily jostled off the ball!


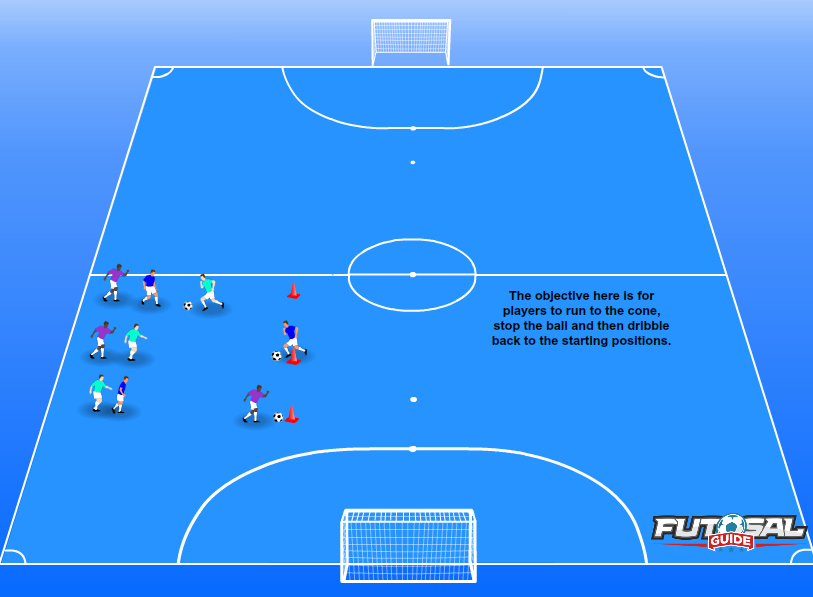
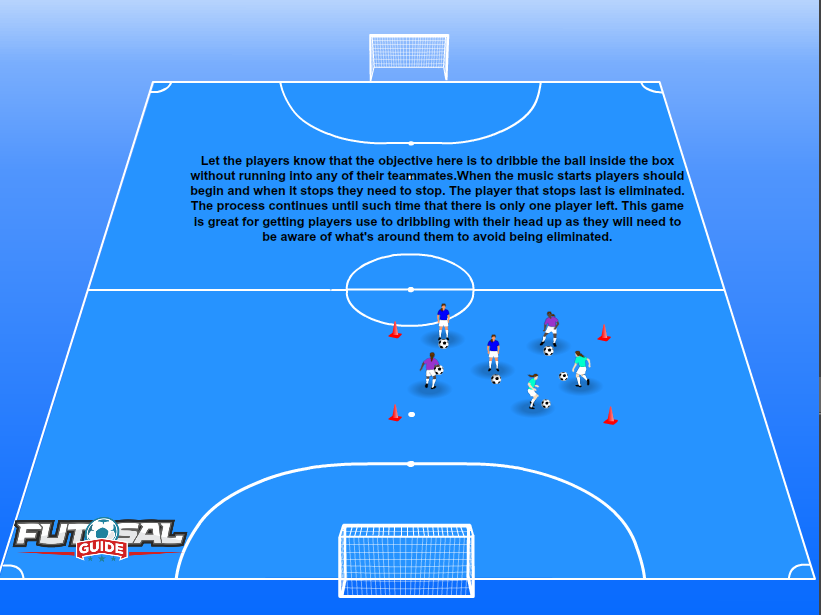
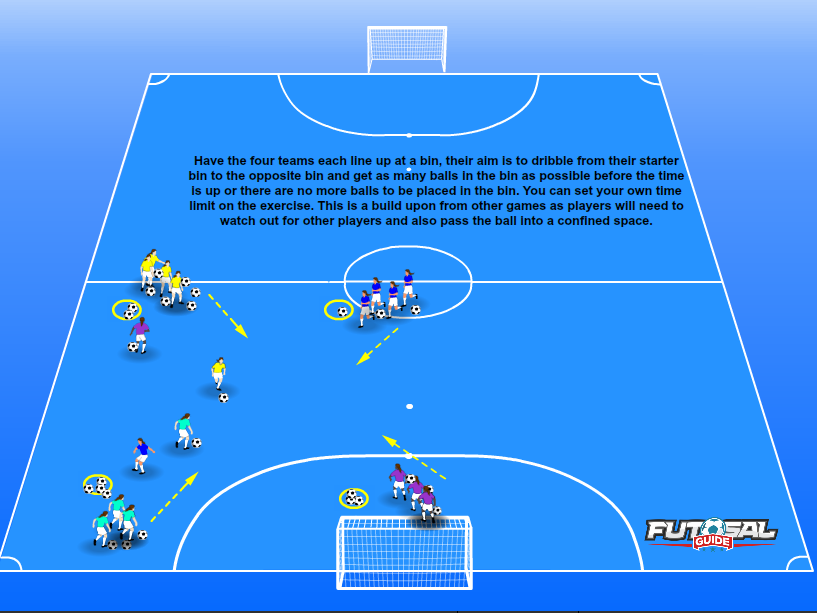
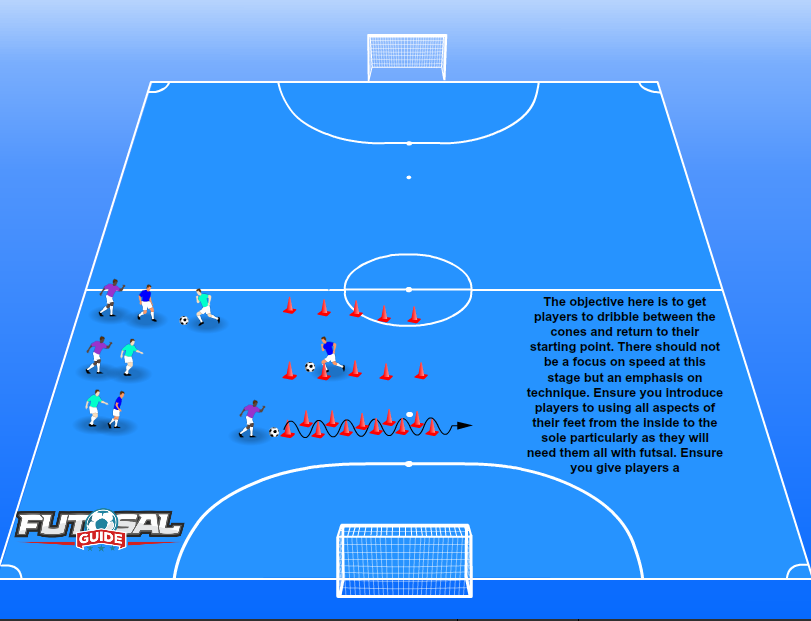
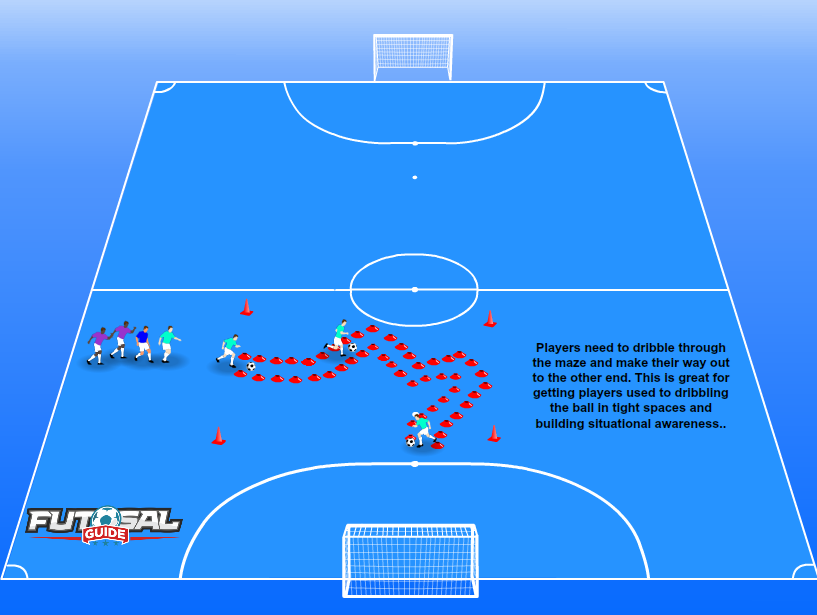
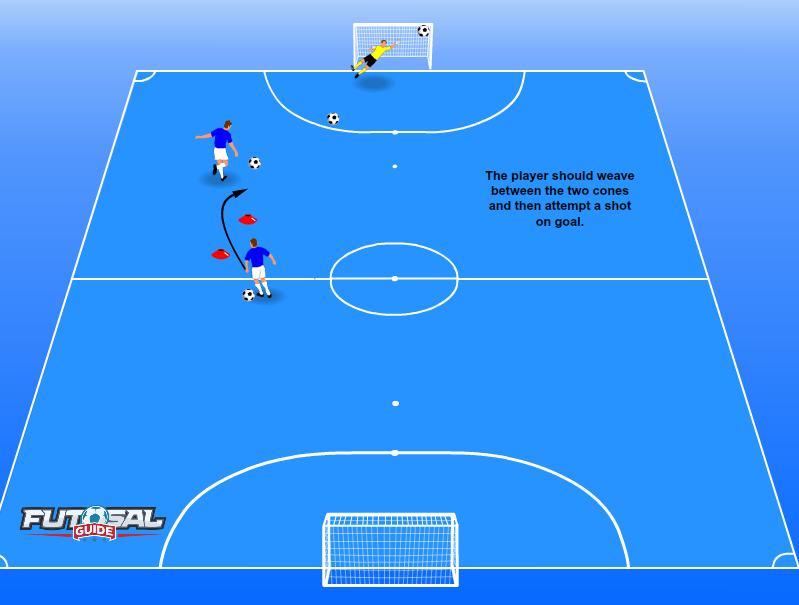
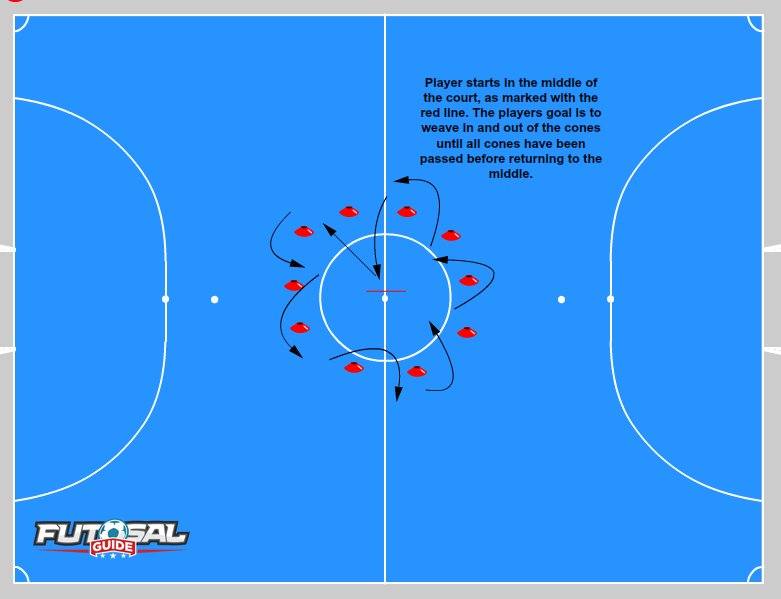
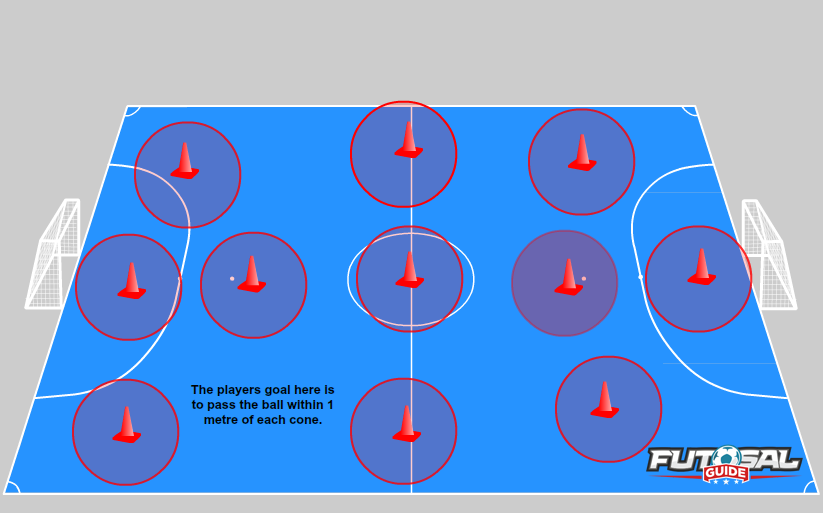
18. Agility Dribbles

Agility Dribble Futsal Warm Up Drills


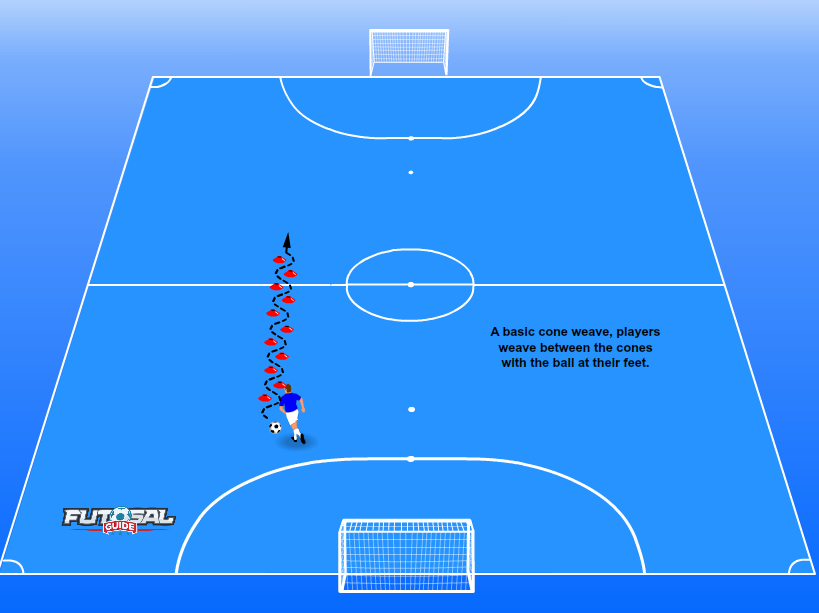
A very basic warm-up exercise, have players dribble through 8-12 cones.


Once players have dribbled through the cones have them pass to a player who will then do the same.


Although basic in nature this will help players warm up while using the ball without having to worry about shooting or a defender closing them down.


19. You Can’t Catch Me

Cant Catch Me Futsal Warm Up Drills


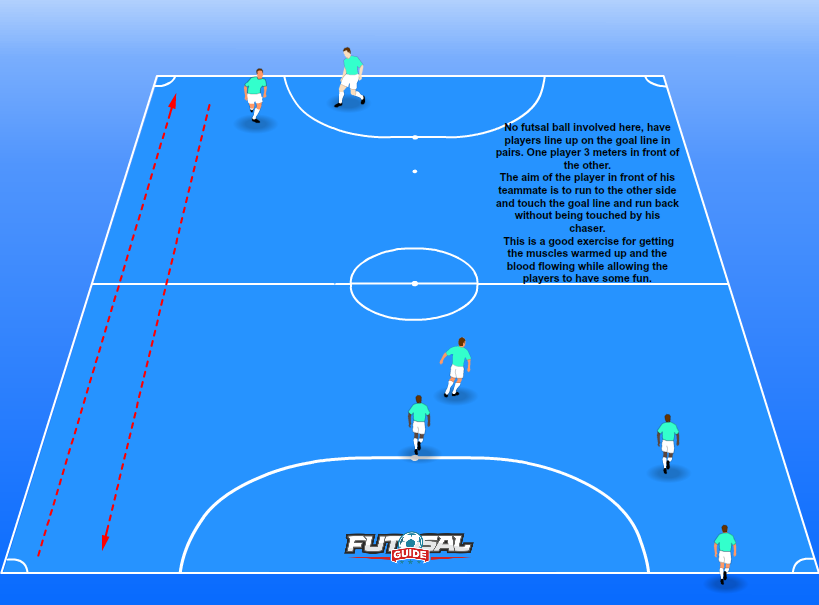
No futsal ball involved here, have players line up on the goal line in pairs. One player 3 meters in front of the other.


The aim of the player in front of his teammate is to run to the other side and touch the goal line and run back without being touched by his chaser.


This is a good exercise for getting the muscles warmed up and the blood flowing while allowing the players to have some fun.


20. Tactics Review


The mind needs to warmed up as much as the body, the go hand in hand and one is out of line the other will normally be as well.


Whether it’s training or pre-game it’s important to inform players of what you expect to occur in order to help them visualize it. You can do this a number of ways such as:


  • Using a whiteboard


  • Watching training videos


  • Using a Tactics Board 


Take this time to ensure players understand what’s required of them, even at an amateur level taking the time to field questions, develop new ideas and resolve issues in a learning environment is just as important as actual physical training drills.


While not exhaustive the above-listed drills and games can be used on almost all levels of players from amateur to professional. You’ll be able to get players in the right frame both mentally and physically for games and training sessions.


Futsal is such a  fast, fun and fluid sport that it’s easy to get stuck in style of play or one type of thought process, the truth is there are so many little things that we feel can really assist any player of any level get those small percentage gains that will help them become an even better player.


When I started playing futsal, I didn’t know any of this stuff so I feel it’s appropriate to share my experiences and knowledge in the hope of helping you on your journey as either a professional or amateur futsal player.


We will cover the following tips that will help you with your progression as a futsal player:


  • Staying Fit and Healthy


  • Staying Committed


  • Training Hard


  • Having The Right Equipment


  • Team Work


  • Using Substitutes


  • Using Your Foot


  • Knowing The Formations


  • Movement


  • Using The Goalkeeper


  • Playing With The Best


  • Avoiding Burnout


  • Warming Up and Down


  • Skill maintenance


  • Keeping It Fun


There’s so much to cover, as you progress you’ll also discover areas that are more personal to yourself. Be sure to work on these and turn them from weaknesses to strengths.


Stay Fit and Healthy


When you’re competing as a futsal player, you need to maintain a high level of fitness in order to remain competitive.


You can do this by eating healthy, getting enough rest and not overloading your body and mind. Even if you’re not competing at a professional level why not stay fit and healthy for all the other benefits it’s going to bring you, right?


When you’re not at futsal training consider doing things like:


  • Eating nonprocessed foods


  • Reducing sugar intake


  • Reducing or avoiding alcohol and drugs


Your mental health and wellbeing are just as important, you can’t play futsal at your highest level if you’re stressed or unhappy. Make sure to spend time with family and friends away from futsal so it gives you an opportunity to have a rest mentally.


Some of the things you can do to ensure you stay stress-free are:


  • Schedule activities outside of futsal with family and friends


  • Read books


  • If something is stressing you out, talk to someone about it


Stay Committed


As with anything staying committed to your futsal is going to help you become a better player in the long run, no one who ever did anything really good got their overnight or by cutting corners, not that we know of anyway!


You need to turn up to games, training sessions and other scheduled club activities. In order to stay committed you need to understand what your long term goal is with futsal. Is it to won the league, become a pro or take out your bitter rivals?


It helps if you have a teammate or close friends that can help motivate you if your feeling tired or distracted, I’ve found it to be a major plus.


Stick to your training schedule, game times and team outings and the rest should flow from there.


Ensure you set goals with timeframes and stick to them, share these with a few close people like a parent, spouse, child or best friend.


Ask them to monitor your progress, if they feel like you aren’t doing what you should let them know it’s okay to give you a mouth full of motivation.


Don’t forget why you are doing what you are doing, to become a professional player or just to have fun you need to have a clear understanding of what that is.


Writing down your “Why?” can be a major help.


Train Hard


When you turn up to training, give it 110%. You aren’t going to get where you want to be if you don’t try your best.


You can also partake in extra training sessions, it doesn’t have to stop at team training. Do drills by yourself, go for runs and join a gym.


You need to be slick on the ball but you also need cardio and strength to help you.


Some of the things you can do to increase your cardio  and strength outside of futsal training are:


  • Swimming, Swim intervals of 50-100   followed by short rest periods. This will help increase your endurance.


  • HIIT, High-Intensity Interval Training, is great for futsal as you’ll increase your explosive pace over short spaces which is what every futsal player should be seeking to improve upon.


  • Compound movements, think squats, deadlifts etc. These exercises are great for building muscle and strength but will also increase your explosive capacity on the futsal court.


Have The Right Equipment


At a basic foundation level, you need the right type of equipment, without you don’t stand a chance.


Whether you are an outfield player, goalkeeper, referee or a manager you are going to need the right stuff.


You can’t expect to turn up to a futsal game wearing outdoor boots, they simply won’t work and they will be dangerous. Goalkeepers need things like kneepads, gloves designed for futsal and a host of other optional add ons.


Time and time again I’ve seen players turn up to match day in a pair of Dunlop Volleys only to find that they suffer when up against the best.


Sport’s evolving fast, you need the best equipment to stand a chance.


Learn How To Work As Part Of A Team


You and your team need to know each other and understand how one another operate. Things like verbal communications, hand signals and body language should are well understood and rehearsed on the training field.


Building teamwork and comradery doesn’t stop on the futsal court, there are a host of other things you can do outside of futsal that can make a major difference come match day.


Consider doing things like:


  • Team dinners, have the team get together off the court at a local restaurant or even a bbq at a local park with or without family. This will help build friendships and comradery.


  • Play a different sport, get together for a game of basketball or another chosen sport. It’s a good opportunity for everyone to get out of their comfort zone and have a laugh at each others expense.


  • Relay games, things like long distance runs carrying heavy items as a team or up a hill. Think big heavy log carried by a few while the other group runs then switches over etc.


Don’t forget to keep training and working on tactics as a team, ultimately nothing is going to beat that when it comes to teamwork.


When the whole team knows and understands something then there will be a huge positive correlation on the court during an actual game.


Use Substitutes At The Right Time


Knowing when to use a substitute at the right time is critical for your team’s success and crucial for any player to avoid long term serious injury.


Futsal players can get burnt out easily during games and will need replacement, the manager needs to be aware of this and watch for signs such as:


  • Players losing focus


  • Lack of pass accuracy


  • Failure to track back


  • Unable to complete easy passes


  • Players appearing visibly fatigued


There is also an onus on players to the right thing and put their hand up when they are feeling tired or fatigued.


Everyone loves to play every minute of every match however the reality is the longer a player stays on the court and the longer they play fatigued they will open themselves up to an injury and their team’s overall performance will also suffer.


Use Your Foot Correctly


If you are used to playing football/soccer, then it’s highly likely you’ll need some adjustment when it comes to playing futsal.


One of the biggest adjustments that you are going to be faced with is the use of your foot/boot on the futsal court.


The use of the sole of your boot is going to be crucial to your ongoing success/ongoing development as a futsal player.


You simply do not have the benefit of lots of space like soccer so it’s important that you reduce the amount of bounce or a poor first touch which will result in a turnover, something you need to avoid.


The use of your sole in futsal will allow you to:


  • Trap the futsal ball


  • Manipulate the ball with the whole surface of your sole, think backward, sidewards and forwards ball movement


  • You’ll be able to roll the ball any way that you are able to control it which opens up a bag of tricks for anyone who can master them


The best way for you to master the use of your sole in futsal is to simply start practicing, so what are you waiting for? Grab a futsal ball and get out there and start trapping the ball.


Understand And Know The Formations


You and your teammates must know the formations of futsal in order to have any chance of being the best you can.


Far too often I’ve witnessed teams and players who have either come from soccer or never played futsal before try and play “freestyle”.


“Freestyle” futsal works at very basic amateur levels, once these players/teams come up against teams that are well prepared and understand rotations/formations they often get torn to bits even if they have more gifted players.


The formations will always reign supreme in futsal and it’s important that any team or player gets comfortable with these and uses them to their advantage.


Don’t Be A Statue


There is so much movement in futsal, you cannot afford to stand still. That being said you don’t have to run/sprint everywhere.


A lot of the time futsal can be played at a pace slightly faster than walking, that being said don’t be fooled.


Between switching formations to playing different rotations it’s important that you keep it moving in order to be in sync with your team and truly dominate.


Get The Goalkeeper Involved


You can tip the scales in any game by getting the goalkeeper involved if your playing over two legs chasing a game or trying to squeeze on in before the buzzer.


Something that’s not seen very often in outdoor soccer, the goalkeeper taking up a post as a 6th player in futsal is quite regular.


While leaving the goal empty and exposed if your team is comfortable with retaining possession you can deploy the goalkeeper to take up a post as an outfield player.


This will aid your team as the opposition will always have one player unmarked, theoretically, you should always have an advantage.


This should only be used for short periods of time until the desired objective is used, it;s advisable to substitute the goalkeeper for an outfield player during these time for maximum efficiency.


Play With The Best


Like it or not, if you want to reach your peak as a futsal player, you will need to play with the best players and team that you can find.


To do this, you need to make yourself known. You may need to get yourself known before this can happen.


Start by joining a smaller lesser known team in the same competition/league. Do your best to help your team win as many games/trophies as possible.


As your team becomes more known bigger players/teams will come to hear about your team and start to take notice of the players within, this will be your opportunity to join the best.


You can also approach the biggest teams and ask to join training sessions or partake in trials.


Even if you join the team as a mediocre player, after repeated exposure to the best players at training sessions/matches time after time your overall game will improve overall.


Don’t Over Exerete Yourself


When you play futsal either socially or at a higher level you will have a lot of opportunities to play extra games almost every day of the week.


Although it’s fun to play futsal, we recommend that you don’t over commit yourself by overtraining/playing.


Try to get at least 2-3 rest days in per week, if you just can’t resist the urge ensure you have “light” futsal days.


Warm Up and Warm Down


Probably the most important thing you can do before any physical exertion, not limited to the beautiful game of futsal.


Warming up is vital to preparing your body for the futsal that lies ahead, not only will your body be ready but your mind will be prepped as well


When you warm up blood pumps to your muscles as well as oxygen to the cells in your muscles. Warming up should put your body under a low level of pressure but not to the point of being fatigued.


Some light exercises to warm up are:


  • Light Jog


  • Sprints


  • Lunges


  • Jumping Jacks


  • Squats


You will also reduce the chance of injury as muscle tension will be heavily reduced, something all futsal players will be keen to avoid.


Warming down post futsal is as important as the warm-up, make no mistake. Just because you may feel perfectly fine after your game/training session doesn’t mean that you haven’t or won’t come down injured.


To warm down simply engage in light stretching, a walk transition to a light job and some light ball work.


If you are having short breaks in between games then you really should consider an ice bath, ice baths are great for reducing bruises and any knocks you may have picked up in-game or training.Ice baths are also great for reducing pain and inflammation.


Keep Fine Tuning Your Skills


Practice, practice and more practice. Talent will only make up for a small percentage of your performance as a futsal player.


What’s more important than talent? Hard work and dedication will eventually outshine talent that doesn’t work hard.


If you are able to get a few friends or teammates together then you should, use the extra time to practice skills such as dribbling, shooting, defending and small sided games.


The more time you put in the better you’re going to get, it’s as simple as that.


If you are just starting out in futsal then take a look at our guide on some drills for beginners here.


It’s All About Fun


Life is short, anything you do outside of work/study needs to be fun. Why does it need to be fun? Because if you don’t have fun and enjoy what you do then sooner or later you will stop doing it.  


It’s likely that you have some interest in soccer or futsal, so a few ways you can ensure that you keep things enjoyable are:


  • Play with friends


  • Don’t over exert your self


  • Stay fit and healthy


  • Don’t over analyze loses, focus on positives and work on weak areas


When you win games of futsal ensure you enjoy the moment but don’t get too caught up and remember that each game is a part of the process on you becoming an overall better futsal player game by game, win, lose or draw.

Futsal is fast and free flowing game that can easily get away from any team who isn’t well prepared or doesn’t have a sound understanding of formations and how they can benefit from them in different circumstances.


The aim of this guide is to give you an understanding and appreciation of the different formations that can be used in futsal and why they can be effective in helping you and your team in dominating the futsal court.


So, what are the different futsal formations? The most widely used and accepted formations used in modern futsal are:


  • The diamond
  • The Y
  • Hail Mary
  • The 4-0
  • The Box
  • The Pyramid
  • Parking the bus


There are of course other formations and tactics that can be used, however, we have focused on the most widely and common used ones. Once you know how they all work you can modify and create your own formations based of these.


The Diamond (1-2-1)


The Diamond Formation - Futsal Formations


The diamond is one the most commonly used futsal formations.It allows for ease of use of players who are outright attackers and defenders, particularly useful when introducing outfield players to futsal for the first time.


The diamond works by having an advanced attacking player that heads up the top of the diamond. This player should be good at holding off defenders, turning defenders and laying the ball of the he wingers.


The quasi “full back/sweeper” holds up the bottom of the diamond and should be capable of defending strongly, have good vocal commands and be able to distribute the ball among teammates.


It’s important the sweeper has a good situational awareness and vision as they will often have times where the whole court is before them and they will be relied upon to make the right call.


The wingers in diamond need to be quick, able to track back and feed of the pivot and sweeper effectively to receive and then make the right decision when it comes to moving the ball around.


It’s critical that the wingers work together to ensure that the pivot is supported efficiently but not at the cost of leaving the sweeper exposed, this again will be assisted by the sweepert communicating what he sees to his teammates.


It’s ideal that all players on the team are comfortable playing these positions, if that’s not possible then back up players on the bench should have selected positions in which they are specialists in order to support the team given the high amount of subs used in futsal.


The Y (1-1-2)


Y Formation - Futsal Formation


The Y formation is one that favours teams that are very strong going forward and are looking to overwhelm a weaker side or trying to peg back a few goals chasing the match.


The Y formation enables there to be two forward players who will act as “strikers” a the top of the formation, it’s important that these two players apply pressure on opposition players high in the offensive half to ensure their teammates are not overwhelmed.


A key benefit of applying high court pressure is that opposition mistakes can present scoring opportunities.


The midfielder that sits behind the two forward attackers holds a pivotal role of responsibility to not leave the last player of the formation exposed to attacks from the opposition.


Ensuring that they do not get caught out being to far forward while also assisting the advanced players while applying pressure is a fine balancing act, this role should only be carried out by a player who has a clear understanding of what’s required.


The last man in this formation much like any futsal formation needs to be sturdy in the tackle, if they are caught out in this formation while their teammates are far advanced they need to be able to quell 2v1 and sometimes 3v1 attacks.


It’s important not to over expose players that are not comfortable with defending and being under pressure.


The Hail Mary(1-0-3)


Hail Mary - Futsal Formations


The Hail Mary formation is a last ditch effort to rescue a match that seems too far gone or to try and grab a las minute equaliser/winner in a do or die game.


Three players will act as advanced forwards with one defender. This formation is heavily reliant on high pressure in the attacking half with the objective of not letting the ball enter the defensive half as it will leave the solitary defender heavily exposed.


The players who are on the left and right of the court should be able to speedily assist the solitary defender in the event of an opposition attack.


These players need to be the fittest and most versatile on team as they will be needed to constantly attack, defend and apply pressure.


This a last ditch formation to save a game when there are no other options that seem plausible and should be used for the least amount of time as possible as it is a high risk/high reward scenario.


Park The Bus(3-0-1)


Park The Bus - Futsal Formations


One that’s sure to make Jose Mourinho smile from ear to ear, parking the bus is great for defending a lead when times running or you want to maintain a buffer.


Three players will play as defenders with one at centre back and a left and right back, in basic soccer like terms. The left and right back should be agile players who can transition into wingers incase another formation has to be used.


There will be one solo attacker in the formations, I recommend using your strongest attacking player in this position.


Using a player who is creative, strong and able to give the opposition defence a hard time will be critical in not only maintaining an offensive reach but also relieving some of the pressure from your defensive players.


Another formation that shouldn’t be over used as there’s only so much defensive pressure any team can soak up before leaking a few goals, it’s also important to keep the subs rolling with this one to ensure players don’t get fatigued with the heavy defensive work rate.


The Box (2-2)


The Box - Futsal Formations


The box formation splits the team in half with attacking players and two defensive players.


This formation makes it clear who is responsible for what and is a formation that can be of most benefit to teams that have well-rounded players who can rotate between all four positions.


It’s important that players communicate well and have a good sense of movement, without both inexperienced teams and players can easily be caught out by opposition sides who will be able to tell fairly quickly if they know what they are doing.


Teams can practice using this formation in training to better familiarise themselves with the formation and focus on communication, the rotations and transitioning to and from other formations.


The Pyramid (2-1-1)


Triangle Formation - Futsal Formations


The Pyramid formation provides a good amount of defensive cover to the goalkeeper while maintaining an offensive outlet for the team.


By adding an additional player to defense teams will feel more comfortable moving forward but they do run the risk of their midfield and offensive players being overwhelmed by switched on teams.


The midfield and advanced attacking player need to work closely together in this formation to support each other in attacking movements and the attacker should also assist the midfielder in defensive duties to ensure that no one is caught out as much as possible.


Again another formation that should be extensively practiced outside of match day with an emphasis on transition to and from other formations, player rotation and pressing.


The 4-0


Four Zero Formation - Futsal Guide


The 4-0 formation is an advanced tactic for advanced futsal players/teams that have a vast knowledge and experience in futsal and it’s formations.


With no positions set in stone, players will rotate between themselves, attack together, defend together and will keep opposition players guessing as to which position or tactic is being utilized at any given time.


A key focus is movement off the ball to open up passing and attacking options for players in possession but to also confuse the opposition and create spaces and openings.


It’s pivotal that any team that tries the 4-0 formation understands the possession retention is critical and that all players need to be on the same page and singing in harmony so to speak, anything less and it just won’t work.


If unable to properly master this technique then teams should focus on the traditional more basic formations that can be just as effective as the 4-0 formation.


Fitness Is Paramount


All of these formations are good and effective but what’s more important is the overall fitness levels of the players in the team.In order for everything to run as it should players need to be fit.


You won’t be able to get fit if you don’t train, cardio and  familiarisation with the futsal court and ball are a must, if you want to perform at maximum capacity then you have to do the hard yards off the court to build up your fitness.


If you are new to futsal then you’ll need to organise/attend the teams training sessions and stay focused to ensure you and your teammates are able to meet the requirements come match day.


You can check out some of our drills for beginners here and an intro guide to running a futsal training session here if you like.


Communication


As important as fitness levels of the team is communication, without nothing will happened and nothing will work.


Players need to understand each other, they should be able to understand each other without talking at times and this will only happen if the team spends a lot of time together on the court and and also off it.


Team building exercises are paramount to this both on and off the court.


Getting It Right


These formations can all be very effective but it’s important that they  are used at the right time when it would benefit the team the most.


By familiarising yourself/team to the formations and practicing them in training sessions you will improve as a unit more effectively when opposed to trying to implement new tactics for the first time on game day.


A great way to practice the formations is without even using a futsal ball and just focusing on the shape of the formation and transitioning into other formations.


This will assist players in gaining an appreciation and understanding of what exactly is required of them. Once everyone understands what’s required formation wise then you should introduce a ball and go from there.


What your team/players do outside of matchday such as training sessions and how often you train will be what determines how well you do on match day, it’s what separates the outstanding from the mediocre in everything not just futsal.


You may have heard of the Beep test, Shuttle run or the Bleep test, It was first introduced in 1982 and developed from the University Of Montreal Track Test. This test was conducted around 400m running track and the pace was increased every 2 minutes by audio cues.


DOWNLOAD THE BEEP TEST AUDIO FILE HERE.


The Beep Test evolved from this by reducing the area required and making it possible for the test to be conducted indoors (this allows environmental conditions to be controlled).


The original test article by Legar and Lambert described a protocol of stages every 2 minutes, later that was reduced to the 1-minute stages we go by today.


The Beep Test is a 20m multistage fitness test. It is commonly used for maximal running aerobic fitness assessment as you can see how quickly your body is able to recover after running and how many stages you are able to complete.


It is very popular due to its ability to test a large number of candidates with minimal equipment. This is an introduction, guide and how to prepare for a Beep Test.


Why The Beep Test?

The Beep Test is actually great for measuring the 3 energy systems, as it combines each of them into a single assessment. Your three energy systems are:


  •    Anaerobic Alactic – This energy system is most commonly used by sprinters. It is explosive in nature and packed full of power, however, it is short in duration and extremely fast to fatigue.
  •    Anaerobic Glycolytic – This energy system is a combination of power and efficiency. It allows you to have had a sustained amount of power while holding for a longer duration than a sprint, think a mile run.
  •    Aerobic – This system is for marathon and cross country runners. It preserves as much energy as possible to sustain a long duration of running. This energy system tends to lack in power to preserve for distance.


Not only can you target the 3 energy systems, but it is also relatively easy to assess a large group and inexpensive.


The Beep Test also allows participants to gain an understanding of pace. This is particularly important in children developing their sense of pace, as well as the runner who often find themselves with energy to burn at the end of a race.


This allows them to get a better understanding of their abilities so they can finish with no energy in the tank and it all on the track. It minimizes the embarrassment of the slowest person to finish or individual not finishing at all, which is great for kids in school.


Equipment

When it comes to equipment for the Beep Test there are a few basic items that are required. These include:


  •    Flat, non-slip surface
  •    Marking Cones
  •    20m Measuring Tape
  •    Beep Test Audio
  •    Music player/speakers
  •    Recording sheets


Pre-Test

Before the session begins it is best to explain the test to those who are going to be involved. Many of the Beep Test audios do have an explanation prior to commencing the test. This is usually to ensure that everyone understands what is required of them and what they are going to be participating in.


Prior to the test being taken any health risks should be screened for. You should also obtain written consent from a medical practitioner to ensure those participating are healthy enough to do so without any potential risks.


Recording sheets should have any basic information filled in. This includes date, age, height, weight, gender, test conditions (ie weather and running surface) etc. Taking down all this information allows correct analysis of the test and comparison points for prior and future testing.


Measure and mark out the course. Utilize the cones to create two lines 20m apart. Use enough cones so the lines are clearly distinguishable. Remember to take your time measuring out the 20m distance between the cones.


This test can be performed indoors or outdoors, as long as the surface is flat and not slippery. Be observant especially if outside if there are any hazards and discrepancies in the surfaces.


Remember to always have a first aid kit on hand and an emergency procedure in place just in case there is an accident.


Depending on the candidates who are participating in the Beep Test and the reason for participation, it may be of use to utilize a heart rate and blood pressure measurement.


Take down these measurements prior to testing and then immediately after testing. This can tell you if your contender has actually ‘maxed out’.


Did you know? The Guinness World Record for the largest Beep Test is held by RAF Honington where over 586 men and women took part!


Prepare Candidates

A candidate completing the test can be of any age and size, they are just required to have some sort of fitness to prevent any injury or health risks. It is great for students, sports teams, individuals, and a variety of athletes.


Prior to the test commencing you should get any of your athletes participating in the test to remove any restrictive jewelry.


This includes bracelets, watches, long earrings – anything that has the potential of causing discomfort, restriction or could get caught. You want your athletes to be as safe as possible with minimal risks.


Allow contenders to warm up adequately before commencing the Beep Test. Warm-ups prevent possible injury, muscle strain and damage to the body, especially when it is about to undergo testing.


Test Preparation

Leading up to the test any athlete running in the session should ensure their body is physically primed and ready to perform to their maximal potential. The ability to perform at your maximum performance is more likely if your nutritional and physical at in top shape.


Nutrition

24hrs prior to the test


In this timeframe, you should consume a high carbohydrate diet. This includes items such as pasta, potatoes, cereals etc. You should also avoid any consumption of alcohol or tobacco substances as these can increase heart rate, blood pressure and affect your overall physical health.


Don’t forget the water either, you need that to hydrate your body and flush out any toxins.


12hrs prior to the test


Fluids are vital when you are going to be pushing your body to its limits. You need to be fully hydrated, especially in warmer conditions. For the 12hrs prior to the test make sure you are drinking water regularly.


Day of test


You need to be well nourished on the day of your test. Be sure to have a good breakfast. It is strongly advised to have consumed something 4 hours leading up to the test.


Don’t have anything heavy 2 hours before as it may make you ill while running and prevent you from doing your best.


You also need to avoid caffeinated products. These include:


  •    Coffee
  •    Coca-Cola
  •    Tea


Any product with caffeine in it can increase your heart rate and blood pressure. You don’t want this especially when you are going to be increasing it yourself from the exercise in the test.


Remember to keep topping your body up with fluids by drinking lots of water before testing begins.


Physical  Condition


Please remember that the beep test does require you to have some physical fitness to participate.


The 24hr leading up to your Beep Test you should avoid strenuous and heavy activities and/or exercise, This prevents any pulling or damage to your body, particularly your muscles.


Day of test


Avoid any additional exercise prior to the test and probably afterward as well. Not exercising before the test allows your body to keep its energy and reserves for the test, allowing you to get your most accurate test result.


Exercising afterward could possibly strain your body too much and cause an injury and you don’t want that.


Wear the appropriate attire for the test. Usually, this includes shorts or track pants with a shirt, singlet or sports top depending on your preferences.


You should also wear non-slip athletic footwear. Using the appropriate footwear can prevent damages to your ankles, knees, and feet. Ensure your footwear is secured and fastened correctly and tuck your laces in to avoid tripping.


You should not participate in the test is you are suffering from an injury or illness that could possibly worsen as a result of taking part in the test. If you are not in good general health, pass on the Beep Test this time – your health and safety is more important.


Remember to warm up prior to beginning the test. A good stretching routine is advised. All participants should also take part in a cool down after finishing the test.


This can be a slow jog or walk, followed by some stretching. Do not just go and sit or lay down after the test as it can cause your muscles to ache tremendously.


Procedure

The Beep Test is continuous running between two lines that are marked out by cones. These lines are 20m apart in distance. Those participating in the test begin behind one of the two lines and face towards the other line opposite them. The recording that is played will then instruct the participants when to begin.


The contenders are to run between the two lines and turn when signaled by the beeps on the recording. The initial pace is quite slow, often a walking speed and will slowly increase every minute. Once a minute is up there will be a sound heard to signify the increase in speed and the beeps will be closer together. This will continue on for each minute – each minute is a level or stage of the beep test.


If those participating in the test reach the line before the beep sounds, they have to wait until the beep is heard to continue to the other line. As the participants progress through the stages they may not be able to keep up with the beeps.


If they are unable to reach the line before the beep sounds they are to be given a warning and continue to run to the line and then turn and try to catch up with the pace of the beeps within 2 more beeps.


If they are unable to catch up then they have reached their max out and should cease to continue the test.


Utilizing heart rate and blood pressure measurements ensures each competitor is pushing themselves. This also allows you to compare their beginning measurements to their maximum measurements allowing you the chance to determine if they have fully pushed themselves to the max.


Scoring

The score is the level and the number of shuttles (20m) they completed successfully before they were unable to keep up with the beeps. You need to record the level and shuttle number that was completed successfully, not the one the participant stopped at.


Reliability


The reliability of this test varies depending on how strictly you conduct the test, the practice allows and many other variables, including physical health and diet. You need to control as many factors as possible to safeguard the reliability of the test conducted.


Here is a rough list to give you an idea of factors that may affect performance:


  •    Health
  •    Diet
  •    Running surface
  •    Weather conditions
  •    Equipment use ie variation of Beep Test
  •    Practice allowed
  •    Warm up
  •    Clothing
  •    Running efficiency
  •    Turning technique
  •    Motivation and social dynamics
  •    Motor skills and cognitive ability (especially in children)
  •    Familiarization with the test and instructions


Pros and Cons

Pros

  •    Test a large group
  •    Minimal Costs
  •    Continues to maximum effort unlike other endurance capacity tests


Cons

  •    Practice and motivation can influence scores
  •    Scoring can be subjective
  •    Environmental conditions can affect results
  •    Can be unreliable depending on how the test is controlled


Variations

The test is known by many names. However, each name can also have a slight difference in the version of the test. Be wary when comparing results of completed tests and comparing results to norms.


The most common version of the test starts at an initial running velocity of 8.5km/hr. This is slowly increased each minute (level) by 0.5km/hr. Another version of the test starts at 8.0km/hr. Then level 2 jumps to 9.0km/hr and from there afterward increases in increments of 0.5km/hr each minute.


Beep Test Ratings

A Beep Test becomes pretty pointless unless you are able to accurately analyze and interpret the information that is provided to you during the completion of the test. Understanding the results is vital to modify training and fitness correctly, especially for high-class athletes.


The images below indicate the expected outcomes for each gender and age group. This allows you to accurately rate your beep test results.


The scores listed in the images indicate the level and the number of shuttles completed.


The information in the tables are read by:

Level / Shuttle Number


*These tables are an indication of general guidelines. Depending on the requirements of the candidates being tests the results may need to be altered.

Example:

A contender who scores an average rating may be excellent for their requirements, while a rating that is good may be classified as a fair rating instead due to their requirements.


The Beep Test is a great assessment of endurance and overall fitness. Remember not to be discouraged by your first result, or even third result – take the time to improve your rating and you will be able to notice a difference. Run the test as smoothly and efficiently as possible and try to standardize the tests as much as possible. See where you max out at!


Related Questions


What is the highest level in the Beep Test?The recording for Beep Tests varies, however, the highest level is typically 25.


How many kilometers will I cover in a Beep Test?This is dependent upon the level and number of shuttles you complete successfully. To give you an idea here are a few levels with the equivalent km ran.


  •    Level 1 – You have run 140m
  •    Level 5 – You have run 820m total
  •    Level 10 – You have run 1,880m total
  •    Level 15 – You have run 3,140m total
  •    Level 20 – You have run 4,620m total


Introducing 5-year-olds to futsal for the first time is always a challenge, sometimes children may not like the sport in the beginning or they may totally love it.


It’s important for any 5 year old starting out in futsal or looking to build upon their existing skill set that they thoroughly enjoy what they are doing otherwise they may lose all interest.


We’ve put together a list of “drills” for 5-year-olds to help improve their futsal, now we use the term “drills” lightly as the aim at 5 years old is for the children to enjoy the sport, so we like to call them “games” more often.


We’ve picked our favorite games/drills to keep your 5-year-old involved and skill building, they are:


1.Piggy in the middle

2.Run and turn

3.Futsal bowling

4.Get the coach!

5.Musical Futsal Statues

6.The Gingerbread Man

7.Bin Bandits

8.Red, Blue, and Yellow

9.The Chickens have escaped

10.Aliens vs Monsters

11.Where’s My Dummy?

12.Find a way out


1.Piggy In The Middle


piggy in the middle- Futsal drills for 5 year olds


Set up: Have players split into teams of three, designate one player as a piggy and have the other two players set up either side. Players should be spaced about 5-7 meters apart with the designated “piggy in the middle”.


You may wish to use cones to mark the distances as a reference as young children can have a tendency to move around a lot


Objective: The player in the middle’s objective is to intercept the ball as the players on the outside is to pass to one another. If the player in the middle intercepts the ball then they swap with the player that last played the pass.


Variances: If the players are capable you may ask them to only play balls on the ground, or in the air only. Be careful though, don’t overwhelm players who are not ready for advances on games.


Young players, particularly 5-year-olds, are still developing a lot of mental processes so keeping drills simple and fun should always be the goal.


2. Run and Turn


run and turn game - Futsal drills for 5 year olds


Set up: Have players line up in three groups. Mark the starting point with a cone, 5 meters away place another cone. The second cone is where the player will turn.


Give every player a futsal ball, if you don’t have enough players for three groups then two will be fine and if you have a lot of players and you think that three groups aren’t enough feel free to make as many as you can manage.


Objective: Although basic the objective here is for the player to run in one direction, stop the ball with the sole of their feet and then turn around and run back to the starting point with the ball.


This is a good exercise to get young children use to turning directions and stopping the futsal ball.


Variances: You can add competition within the teams to introduce a competitive angle. Tell the players that the team who has all players go through the quickest will be the “winners”.


You may also wish to have players go around the cone with the ball instead of stopping and turning.


3.Futsal Bowling


Futsal Bowling - Futsal Drills For 5 Year Olds


Set up: Set up two ones. One cone will represent a starting point, the other will act as a target. In the spirit of our “games” theme refer to it as a “tenpin” as most children are familiar with tenpin bowling.


The “tenpin” should be set up 5-7 meters from the starting point.


Objective: The objective of the game is for players to hit the cone by kicking the ball and knocking it over. This will help players with aiming and hitting targets.


Not all of the players will be able to hit the “tenpin” and that’s fine, it’s about building those skills over time that will go onto to be the foundation of their passing.


Variances: You can add extra elements to this game by adding more cones and increasing or decreasing the distance of the “tenpin” from the starting point depending on skill sets.


Ensure the children understand it’s a game and that the tone is set from the start of the exercise.


4. Get The Coach!


get the coach - - Futsal Drills For 5 Year Olds


Set up: Set up a box using cones. Have players break into four groups and line themselves up. Ensure each player has a futsal ball. The box should be 5-7 meters x 5-7 meters.


Now if you are the coach or just a parent who likes to help out it doesn’t matter much, throw yourself in the middle with a bib if available.


Objective: Brief the players and let them know that the goal is to hit you with the ball. Once they hit you with the ball kick it back to them so they can have another turn.


Do not try and run and hide, it’s the kids chance to dish out some payback for all the veggies you’ve been making them eat.


Variances: Consider making the box smaller, standing in different areas or walking/running around, initially though you should stand still and give the children an opportunity to target you.


5.Musical Futsal Statues


Music Futsal Statues - - Futsal Drills For 5 Year Olds


Set up: Set up a box with cones, 10 meters x 10 meters or bigger if you need to, according to the number of players present.


You’ll also need a boom box or radio for this one and some children friendly music. Provide each player with a ball and have them enter the box.


Objective: Let the players know that the objective here is to dribble the ball inside the box without running into any of their teammates.


When the music starts players should begin and when it stops they need to stop. The player that stops last is eliminated.


The process continues until such time that there is only one player left. This game is great for getting players use to dribbling with their head up as they will need to be aware of what’s around them to avoid being eliminated.


Variances: To increase difficulty you can make the box smaller as players are eliminated and stop the music a lot more frequently.


6. The Gingerbread Man


The Gingerbread man- - Futsal Drills For 5 Year Olds


Set Up: Have players pair up, one with the ball one without. Players with the ball should stand 10 meters away from the player without the ball.


Objective: The objective in this game is for the player without the ball to touch the player with the ball. While the player with the ball will seek to stay away from the other player for as long as possible.


Once the player with the ball is touched then they swap with the chasing player. This is a great game for building young players sense of awareness when they have the ball and to get them used to running away from opponents.


Variances: You can have multiple players chase one player, just be sure to give the player with the ball an even bigger head start to ensure they have a fair opportunity. You can also play the game within a box to increase difficulty.


7. Bin Bandits


Bin Bandits - Futsal Drills For 5 Year Olds


Set Up: For this exercise see if you can get your hand on 4 bins, if not you’ll need 16 cones. Set up the cones in four corners, like a box.


You can use half a futsal court if you’d like as it’s pretty easy and gives the players plenty of space. Divide the team up into four teams and ensure each team has an equal number of balls.


Objective: Have the four teams each line up at a bin, their aim is to dribble from their starter bin to the opposite bin and get as many balls in the bin as possible before the time is up or there are no more balls to be placed in the bin. You can set your own time limit on the exercise.


This is a build upon from other games as players will need to watch out for other players and also pass the ball into a confined space.


Variances: You can increase the number of balls, make the field bigger and reduce time frames to increase the difficulty of this game.


8.Red, Blue, and Yellow


red,blue and yellow - Futsal Drills For 5 Year Olds


Set Up: Divide your team up into three groups, name them as follows:


  • Red
  • Blue
  • Yellow


If you have red and blue bibs great, if not players will need to try and remember their allocations. Have reds stand on the left side of the field and blues on the right. Have yellows stand in the middle.


Objective: During this game, the coach or training supervisor will yell out a color, and the yellows need to pass the balls to the respective color player whom then returns the ball to the yellow player.


This game is great for getting players used to responding to verbal commands that could come from their coach on the sideline or even a teammate.


Variances: If players are adapting well to this drill then you may wish to add more “colors”.This will increase the difficulty and assist players to develop decision-making skills on the court, be careful to not overwhelm players though.


I wouldn’t recommend adding any more than one additional color to the game.


9. The Chickens Have Escaped!


The chickens have escaped- - Futsal Drills For 5 Year Olds


Set up: In this exercise have all of the players line up on the goal line. Kick balls in and around the futsal court. Stand in the goals. Ensure you have at least one ball per player, two is even better.


Objective: The objective in this game is to have the players run from the goal line and retrieve the balls. Once the players have retrieved the balls then they should dribble back towards the goal.


Whoever is standing in the goal should not move, the players aim is to dribble the ball into the net and go back to collecting any other balls.


This is a fun exercise for the children that gets them familiar with putting the futsal ball in the back of the net.


Variances: You may wish to add a “fox” to the game, the fox’s goal isn’t to catch anyone but to simply run close to players to put them under a tiny bit of pressure.


10. Aliens vs Monsters


Aliens vs Monsters - Futsal Drills For 5 Year Olds


Set Up: This is a small sided game, it’s best to use half of the futsal court for this one. Set up two small goals with other if you don’t have a futsal goal you can move around or bring in the goal from the other side.


P.s it doesn’t have to be called “Aliens vs Monsters” it can be whatever you think will get the best response and engagement from the children.


Objective: As this is a small sided game the players should be encouraged to score goals and work as a team.


Use the opportunity in the game to stop players and explain things to them or ask them if they could have made better decision making skills etc when there are turnovers.


This is also a great opportunity to start talking to players about the rules of futsal etc and the importance of teamwork.


Variances: Don’t be afraid to add extra challenges like try and score a goal without letting the other team touch the ball etc.


If one team is far superior to the other then consider handicaps and swapping players around in order to get an even balance.


11. Where’s My Dummy?


Wheres my dummy - Futsal Drills For 5 Year Olds


Set Up: Set up a row of cones in a straight line 8-10 should suffice. Have players line up in a straight line. If you have enough players then split them up into multiple groups so long as you have the cones and balls to accommodate them.


Objective: The objective here is to get players to dribble between the cones and return to their starting point. There should not be a focus on speed at this stage but an emphasis on technique.


Ensure you introduce players to using all aspects of their feet from the inside to the sole particularly as they will need them all with futsal. Ensure you give players a demonstration and clearly explain what you would like them to do in this drill.


Variances: Have players complete the drill with only the inside of their feet, only the outside and so on. The more variances you add, so long as they are capable, the better they will perform and be able to build upon and master other skills in more advanced training sessions.


12. Find A Way Out


find a way out - Futsal Drills For 5 Year Olds


Set Up: Use cones to set up a 10-meter x 10-meter box. Ensure the colors of the cones on the perimeter are not going to be the same as the ones in the middle of the box.


Within the middle of the box set up a  maze using cones, ensure the cones have two sets to create ”tunnels” for the players to dribble through.


Objective: Players need to dribble through the maze and make their way out to the other end. This is great for getting players used to dribbling the ball in tight spaces and building situational awareness.


Variances: You can add color codes and only allow certain players to use certain paths etc, this increases difficulty and makes players think a little more while dribbling.


Once again, the focus of this drill should not be on speed but on technique and accuracy and following instructions


It’s Always About Fun


Well, that’s our list of top 12 futsal drills for 5-year-olds.It’s always important that no matter how bad any parent wants their child to be the next superstar that the wellbeing of the child isn’t overlooked.


These drills/games should allow your child and others to have fun while getting familiar with futsal from an early age. Always reinforce positivity and ensure that safety and wellbeing are put above all else.


.


Starting to play futsal for the first time? It’s not the easiest sport in the world to play but nor is it the hardest, regardless of your age it’s never too late to start a new sport including futsal.


Before you decide that it’s too hard or can’t be done have a  read of our list of futsal drills that will help you become a better player and raise your level of fitness at the same time.


These are all basic drills for futsal beginners and provide a  good base point to build upon.


The basic futsal drills we will cover to help you in your progression as a futsal player are:


  • Two Cone Shuffle
  • Cone Weave
  • Two Cone Shuffle and Shoot
  • Cone Weave And Shoot
  • Circle Weave
  • Return Pass & Shoot
  • Boxed In
  • Beat The Defender
  • Penalty Shots
  • Corner Drills
  • Small and Big Goal Challenge
  • Zone Passes
  • Practice Shooting


Why Agility & Ball Control?


Agility drills are a great way to improve your physical fitness as well as improve on ball control and technique as they should be done as quickly as possible, at first it may seem enough to complete the drills without a futsal ball let alone while trying to keep one under control.


We assure you though, the more you practice the agility drills with and without the futsal ball the better you’ll get.


By incorporating ball control into your agility drills you’ll get the best of both worlds.


Adding timings and extra players to the mix is another sure fire way to improve your control of the ball while under pressure from other players.


1. Two Cone Shuttle


Cone Shuffle- Futsal Drills For Beginners


Set up two cones across one half of the futsal court as demonstrated in the example image. The goal here is to run between the cones.


Player’s shouldn’t cut across the cones and must go around the cones. This two cone shuttle is basic in nature but is great for getting players used to turning with and without the ball.


Tips:


  • Do the drill as fast as you can with and without the ball, then work towards beating your time.


  • Use both your weaker and preferred foot when doing the drill with the ball and see if you can get your weaker foot timing as good as the dominant foot timing.


  • Run through the drill touching the ball with only the outside of your foot and then again with only the inside of your foot.


2. Cone Weave


Cone Weave - Futsal Drills For Beginners


A step up from the two cone shuffle, the cone weave assists players in improving agility and turning in tight spaces.


By helping players move left and right, you can expect to see an improvement on the futsal court come game day when surrounded by players in tight spaces.


Tips:


  • Try doing this with both feet to weave in and out of the cones.


  • Try using your dominant foot only and timing it, then try matching that time with your weaker foot.


  • Use only the inside of your foot and then do the same with the the outside of your foot only.


  • Set a personal best time and then seek to improve upon it weekly.


3. Two Cone Shuffle And Shoot


Cone Shuffle And Shoot - Futsal Drills For Beginners


In this exercise set up two cones a distance apart, what you want to do here is weave between the two goals and follow it up with a shot on goal.


This is a basic step up from the two cone shuffle and will help you to start thinking of other things following your weaving between the goals.


As there is minimal pressure in this exercise you should be able to hit the target most times and if you aren’t then you should keep practicing until you are efficient.


Tips:


  • Challenge yourself with different scoring methods i.e. shots in the air, shots on the floor lobbed shots etc. If you get really good aim for the crossbar or goal posts.


  • Move the cones around the futsal court to ensure you are exposed to different areas.


  • Focus on areas of the court that don’t feel natural and ensure your weaker foot is given as much opportunities on the drill as your dominant foot.


4. Cone Weave And Shoot


Cone Weave And Shoot - Futsal Drills For Beginners


Another step up from the cone weave, this drill will require you to weave between a number of cones before shooting at the futsal goal.


This drill will help you come match day as you get used to weaving around players and moving in tight spaces before shooting at the futsal goal.


Tips:


  • You can do this drill using both feet, weaker foot only and using only the outside and or inside of your foot.


  • Ensure your time your drills so that you have a benchmark to which you can improve upon.


  • If you have a teammate or friend have them jockey you at the end of the cones to add extra pressure to the drill.


5. Circle Weave


Circle Weave- Futsal Drills For Beginners


In this drill set up cones to form a circle, you can add as many as you like within reason. Use the centre circle as a guide as per the explainer image.


In this drill start in the middle as indicated by the red line, this will also be your ending point.


Aim to dribble between all of the cones using both your feet and insides and outsides of your boot only.


Tips:


  • If you have a teammate have them commence the drill 20 seconds after you. Their goal should be to catch you while your goal is to finish the drill before they do. This will add some pressure to the drill and assist you in dribbling the futsal ball while under pressure.


  • Once you complete the drill, reverse and head in the opposite direction, this well test your bearings and extra pressure on your body and mind.

6. Return Pass & Shoot


Return Pass And Shoot- Futsal Drills For Beginners


In this drill, you’ll need at least one other player and preferably a goalkeeper. If you don’t have a goalkeeper available then place a cone in the goals with the objective of hitting it with your shot.


Have your teammate stand near the touchline, right or left it doesn’t matter. Dribble the ball at speed and pass to your teammate. Your teammate will then play the ball back to you.


When the ball is played back to you take it under control with no more than two touches before shooting at goal.


Tips:


  • To increase difficulty take the shot first time without breaking stride, this will help you get comfortable in situations where breaking stride isn’t an option.


  • Try 5 times on your left foot and 5 times on your right foot, have your teammate swap sides to ensure you are getting exposure to the ball coming across your body from both sides.


7. Boxed In


Boxed In- Futsal Drills For Beginners


In this exercise, set up a box that is 2.5 metres x 2.5 metres. In this exercise you can have a teammate pass you the ball in the air with the objective of controlling the ball within the 5 square meters of the box.


This will improve your ball control and technique in confined spaces, and it will get easier the more times that your practice it.


Tips:


  • To make it more difficult consider closing the space of the box.


  • Have the ball come in from different sides and at different heights.


  • Have balls come in in quick sequence.


  • If you don’t have a teammate to practice with then simply play the ball up in the air to yourself, the higher it goes the harder it will be to control on the way down.


8. Beat The Defender


Beat The Defender- Futsal Drills For Beginners


In this drill, you’ll need a defender and goalkeeper. Start inside your defensive half dribbling through a set of cones. Once you transition into the offensive half you’ll be faced with a defender.


You’re goal is to beat the defender and go one on one versus the goalkeeper while seeking to score a goal. This drill is a little bit more strenuous than what we have been doing so far.


It will get you use to carrying the ball from inside your defensive half and transitioning into attack while trying to score a goal.


This drill ends when one of two things happen:


  1. The defender wins the ball or,


  1. You take a shot on goal


You should run through this exercise and ensure, you guessed it, both feet are used to control and shoot the ball.


9. Penalty Shots


Penalty Shots- Futsal Drills For Beginners


If you decide on playing futsal for any serious period of time odds are sooner or later you will be asked to take a penalty.


Unlike soccer there are two penalty spots in futsal and it’s important that you are comfortable with taking penalties from both of them.


You should focus on using medium power with an emphasis on placement to begin with, there’s no point striking the ball as hard as you can if you can’t accurately place it.


Once you’re comfortable with taking penalties and you can do so with accuracy then consider using more power as come match day you will need powerful and accurate shots if you want to stand any chance of beating the goalkeeper.


Remember, this isn’t soccer, try giving a “toe punt” a try and see how you go.


10. Corner Drills


Corner Drills- Futsal Drills For Beginners


It’s important that beginners are familiar with all aspect of the futsal court, to ensure that you are then you’ll need to practice your corner taking.


Corners are important as they offer an attacking advantage when played right and within a teams tactics and plans. For now though we are just going to focus on the aspect of taking a corner and doing it with accuracy.


Ideally you’ll want  a teammate who you can target, but if not don’t worry you can still carry out this drill on your own. Set up cones around the goal and try to hit them with a corner cross.


Tips:


  • Hit the cones all once with ground passes.


  • Hit the cones with balls played in the air.


  • Number the cones and hit them in sequential order, then do it backwards.


If you can do all of the above-listed exercises then once it comes to game day you’re team will do well to entrust you with the corner taking responsibilities.


11. Small and Big Goal Challenge


Small And Big Goal Challenge- Futsal Drills For Beginners


In this drill, players will line up in their defensive half with a ball each. In the middle of the pitch there will be a goal to the left or right it, doesn’t matter which side at this stage. There will also be a defender located at the goal.


The objective here is for the attacker to beat the defender and score, after scoring the attacker should continue running into the offensive half where a teammate will pass them the ball.


The player will then take a shot on goal at the “big” futsal goals.


Tips:


  • To increase difficulty players should only take one shot on goal.


  • Make it so the balls are passed on the ground and in the air to make it more challenging for the attacking player.


  • If the defender wins the ball then they should swap with the attacker straight away


12. Zone Passes


Zone Passes- Futsal Drills For Beginners


Although the futsal court is much smaller than a soccer field, there will be instances when players will be required to play long balls across the court to teammates in order to take advantage of situations.


It’s ideal if you have players that you can pass to for this drill, you can however set it up on your own and have cones to pass to represent different zones.


You’ll should rotate positions across the futsal court so you are accustomed to playing the ball from all angles to the various areas of the court.


Tips:


  • If you find this easy try changing out the cones for bins and only consider the zone hit if the ball hits or enter the bin.


  • Go through all zones with both feet.


  • Play ground balls and lobbed balls to all zones.


  • If a team mate is available have them call out the zone numbers for you to keep you on your toes.


  • Time how long it takes you to hit each zone, try and beat this time in future training session.


Once you can master this drill you will be well on your way to mastering the navigation of the futsal court.


13. Practice Shooting


Practice Shooting- Futsal Drills For Beginners


While familiarising yourself with the futsal court, be sure to take some time to practice free shooting, with or without a goalkeeper.


Your aim here is to become so familiar with the futsal goal and where it is located that you’ll be able to shoot without looking, well sometimes, and be comfortable with your bearings on the court.


Don’t worry too much about setting up different cones or a defender to beat only worry about beating the goalkeeper.


Tips:


  • Try for placed shots initially with a focus on hitting the back of the net in an area you visualize


  • Add power once you find your shots are accurate enough


  • Make sure you try shots across the ground as well as lifted ones


  • Don’t forget to use both feet evenly


Practice Makes Perfect


The 13 beginner futsal drills listed above, are just that baseline beginner drills. They are not the most basic of introductory futsal drills but are designed to test you and improve your skills and fitness.


Don’t be disheartened if you struggle with the drills at first, remember that the more you practice the drills the better you will become and your fitness and ball skills will improve dramatically as a result.


You can always add extra variants to the drills to make them more challenging, once you are comfortable with them however it will be time to move on to intermediate and advanced drills to ensure you continue to improve on your futsal journey.


Getting hurt sucks! Whether you are playing futsal for enjoyment, socializing, fitness or whatever else it is a little difficult to do anything when you are stuck nursing an injury back to health.


When it comes to sports it is essential that you warm up correctly. Your warm-up prevents injuries during activities, but did you know you can get injured while warming up?


Although it can be difficult in knowing how and what the best exercises are, you do not have to worry anymore, we have got you covered. Ignorance is not bliss when it comes to warm ups and if you ignore them you are most certainly going to get hurt at some point.


Psst! You do not have to do all these exercises in one go. You can complete a combination of them, just remember to target your whole body. A short warm-up is better than no warm up!


Here is a list of the best warm-up exercises and how to complete them correctly.


  1.   Arm Rotations


  1.   Torso Rotations


  1.   Neck Rotations


  1.   Leg Kicks


  1.   Skipping Rope


  1.   Jumping Jacks


  1.   Lunges


  1.   Grapevine


  1.   Side Shuffle


  1.  High Knees


  1.  Back Pedaling


  1.  Walking Knee Hugs


  1.  Lateral Lunge Windmill


  1.  Inchworm


  1.  Pogo Jump


  1.  Light Jog-Run


  1.  Push-ups


  1.  Sit Ups


  1.  Burpees


  1.  Glute Kicks


1.  Arm Rotations


  •      Hold your arms out horizontally 90 degrees to your body.


  •      Rotate your arms forward and complete a circle.


  •      Repeat the above action but backwards.


  •      Now rotate one arm going forward and one arm going backwards.


  •      Then switch arms so the arm that was going backwards now circles forwards and vice versa.


2.  Torso Rotations


  •      Stand with your feet shoulder width apart.


  •      Hold your arms out horizontally at a 90-degree angle to your body.


  •      Rotate your torso to bring your right hand in front of your left shoulder.


  •      Return back to the starting position.


  •      Now twist your torso to bring your left hand in front of your right shoulder and return.


3.  Neck Rotations


  •      Face forward in a relaxed stance.


  •      Tilt your head to the left and return to the center.


  •      Lean your head to the right and return to the middle.


  •      Angle your head back so you are looking up and return so you are facing forward.


  •      Now drop your head forward so you are looking down and return.


4.  Leg kicks


This lubricates your hips for movement, improves balance and stretches your legs out.


TIP: It is best to do this exercise with something to brace yourself against. Facing a pole works great!


  •  Stand in front of the pole and place both palms firmly on it. You should be far enough away from the pole that your arms are fully extended.


  • Have your feet roughly shoulder width apart.


  • Now take your left leg, swing it back, and follow through so it is in front of you. Be sure you are not going to collide with the pole.


  •  Then return it to the beginning position


  •  Now repeat the same action with your right leg.


TIP: It is best to do this exercise with something to brace yourself against. Facing a pole works great!


5.  Skipping Rope


Jumping rope gets your blood pumping, increases your heart rate and loosens up your muscles.


  • Place the handles of the skipping rope in each hand.


  • Have the rope behind you. Keep your elbows tucked in.


  • Circle your forearms to bring the rope in front of you and jump.


  • Repeat.


TIP: Maintain your speed and for the last 30 seconds power it out and speed it up.


6. Jumping Jacks


This is a full body warm up. It stretches out and warms up your limbs and increases your heart rate.


  • Start with your feet together and your hands by your side.


  • Simultaneously you are going to jump stretching your legs out to shoulder width apart or wider and bringing your arms up in the air. Your body should look like an x as you land.


  • Then you are going to jump again and land back in your starting position with your feet together and hands by your sides.


7.  Lunges


This targets your major muscles in your lower body.


  • Begin with your feet shoulder width apart and your toes facing forward.


  • Step forward with your right foot and bend your right knee until your left knee is touching the ground behind you.


  • Then bring your left foot forward in front of your right. Bend your knee until your right knee touches the ground.


TIP: Remember to keep your back straight to ensure you have proper posture. Your head should be facing forward. You will be moving horizontally so be sure you have room.


8. Grapevines


Improves your lateral movement, increases flexibility, footwork and loosens up various muscles such as quads, hamstrings, calves, glutes and core.


  • Step out with your right foot to your right side. Follow with your left foot that crosses over in front of your right leg.


  • Now take your right leg and cross it behind your left so that it is in front again.


  • Bring your left leg together so you are in a normal standing position.


  • Repeat the steps in reverse order.


  • Cross in front, then back.


  • While you are crossing over your legs you should aim to twist your torso while doing the footwork to increase the workout to your core.


TIPS: Go slow first to ensure you have proper technique and getting the full benefits of this warm up.


Be sure you bend your knees, keep your head up your shoulders back and relaxed.


make sure your feet are firmly planted before moving again to avoid tripping.


9. Side Shuffles


This warms up your lower body, and improves foot work.


  • Start with your feet approximately shoulder width apart.


  • Bend your knees and waist to crouch low – remember to keep your back straight.


  •  Now you are going to sidestep out with your right foot.


  • When you have planted your right foot, you are going to close the gap by bringing your left foot next to your right. This targets your right side.


  • To target your left side. Sidestep out with your left foot and bring your right foot next to it to close the gap.


10.  High Knees


Great to increase your heart rate and get your blood pumping while targeting your hamstrings.


  •  Place your hands in front of your body at hip height or higher.


  •  As you jog along you are going to bring your knees up to make contact with your palms.


  •  Your steps should be small to ensure you are getting the height and not losing your balance.


TIP: Make sure your back is straight, your head is facing forward and you aren’t lowering your hands as you make contact with your knees.


11. Back Pedaling


This focus’ on balance and quick feet movement.


  • Essentially your are going to jog backwards with light steps.


  • Turn your back to the area you are warming up in. Be sure that there is nothing in your way that you may trip over.


  • Take your left foot and step backwards. As soon as your foot hits the ground you want to take your right foot and step behind your left.


TIP: Your aim is to be springy on your feet as you transition to each foot.


12.Walking Knee Hug


Targeting your lower muscles particularly your hamstrings and developing your balance.


  •  Start with your feet apart.


  • As you go to take a step forward you raise your knee up to your hip height or higher.


  • Then you use your hands/arms to ‘hug’ your knee and pull it in towards your belly or chest. This should not be painful – if it is you are pulling in too far.


TIP: Remember to keep your head forward and your back straight.


13. Lateral Lunge Windmill


Improves side to side movements and balance.


  • Spread legs approximately double shoulder-width apart.


  • Your feet should be facing forward.


  • Shift your weight to your right side – this stretches out your left leg.


  • Your right knee should be bent at 90 degrees. Similar to a forward facing lunge.


  • Take your left hand and place it on the floor on the inside of your right foot.


  • Twist your torso and reach to the sky with with right hand.


  • Reverse your movements and repeat on the left.


14. Inchworm


The Inchworm loosens hips, hamstrings, calves and elevates your heart rate.


  • Start in your standard push up position on your toes not the knees. Keep your palms flat on the floor.


  • Your legs need to remain straight as you inch your feet forward towards your hands.


  • Once your heels are flat on the ground keep your shoulders over your hands.


  • You should somewhat look like an upside down U or V.


  • Then inch your feet backwards until you end up in your original push up position.


TIP: If you are struggling to get to the point where your heels are flat and legs are straight. Use a small box or step and place it under your hands to elevate slightly.


15. Pogo Jump


This fires up your nervous system and switches on your muscles.


  • Stand with your feet shoulder width apart. Jump vertically.


  • As soon as you land jump again. Your aim is speed not height. Picture jumping on a Pogo stick.


16.  Light Jog-Run


This increases your heart rate, warms up your muscles for movement and gets your adrenaline and endorphins running.


  • Go for a light jog for a few minutes either on the spot of over a distance.


  • For the last section or 30 seconds of your jog you could power through a sprint.


17.  Push Ups


This targets your whole body from your arms and shoulders to your core and legs.


  • Your hands should be placed shoulder width apart or a little wider. The wider your hands are the easier it is to perform your push up.


  • You can either place your feet together or hip width apart. It is important to keep on your toes. There should also be a straight line should running from your heels to your head.


  • As you bend your elbows and lower your body to the ground your fingers should be spread out with your middle fingers point 12 o’clock.


  • When your elbows reach around a 45 degree angle to your body (elbows in line with your shoulders) you push back up so you are in your starting position.


TIPS: Listen to your body if it is hurting change you hand or feet placement. Everyone is different and depending on your strength and shoulder mobility will affect your stance.


18. Sit Ups


This targets your core in particular.


  • Lie down on your back. Bend your knees and set your feet around hip distance apart. You can either place your hands on the back of your neck, on the side of your head or across your chest.


  •  Take a breath in and exhale.


  • ‘Pull’ your belly button in toward your spine as you gentle raise your torso by bending at the hips and waist. Lift until your torso is just inches from your thighs.


  • Inhale and control your return to the beginning position.


TIPS: Wherever you place your hands you need to be light with them and ensure you are not using them to push or pull yourself up. Move slowly and control the movements to prevent using momentum rather than warming up your muscle.


19. Burpees


A full body warm up that gets your blood pumping.


  • Squat down and place your hands on the floor in front of you, just outside of your foot placement.


  •  Jump or walk both feet back so you are in a planking/push up position.


  • Drop down and complete a push up, returning back to your planking position.


  • Jump or walk your feet back towards your hands.


  • From your squatting position jump into the air, reaching your arms to the sky.


  • Land and return to the beginning pose.


20. Glute Kicks


Targets your hamstrings, glutes and quads to prepare for movement while increasing your heart rate.


  • Start by standing with your feet apart, proper posture and your hands by your sides.


  • Raise one foot off the floor and allow it to touch or almost touch the area just below your bum.


  • Return your foot to the ground and repeat on the other side.


  • You can do this in one on the spot or over a distance.


TIP: Remember you shouldn’t move your thighs at all and try to increase your speed as you go once you have the technique down pact.


Why is warming up so important?


Muscles are like rubber bands. If you try to stretch it out immediately without slowly increasing the stretch it is more likely going to snap! And that is just what your muscles will do.


Loosening, warming up and ‘activating’ your muscles to work will keep them strong and injury free.


It also primes your system by improving your blood circulation which helps you to perform better.


Warm-ups also begin to release endorphins and adrenaline in your body which helps in you pushing your limits.


Make sure your warm-up targets the muscles you are going to be using during your activity.


It is great to do a combination of the listed exercises with a few reps or for a few minutes.


Ultimately, it is up to you on how many reps and how much time you spend on your warm up, just remember to target all your muscles!


Related Questions


What is the difference between stretching and warming up?

Stretching is to increase your flexibility and range of motion. Warm ups are meant to elevate your core temperature and increase your blood flow.


You should ideally do a warm up before stretching to avoid straining your body and causing injury.